Saturday, 4 May 2013

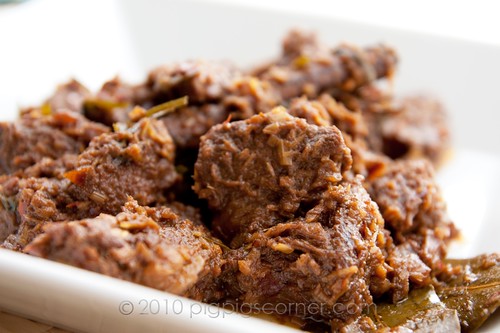
Beef Rendang

I'm Malaysian but if you've been following my blog, you'd noticed that I rarely cook Malay, Indian, Nyonya food...well food that involves a long list of herbs and spices. I love spicy Malaysian food but Malaysian cooking is tedious. In Malaysia, we take such food for granted because it's so readily available and cheap, it never once crossed my mind that I want to start grinding spices to make my own curries. Besides, we can buy fresh ready-ground herbs and spices from the wet market with no artificial additives or preservatives added. Spoilt, I know =P

But I'm not in Malaysia now, I can either pay a hefty amount of money (as compared to what you pay in Malaysia) for a meh Malaysian meal or I can try making some myself. I saw this beef rendang recipe at Lizzie's blog and thought I had to make it.

Beef Rendang 1

Rendang is extremely popular in Malaysia and is one of my favourite meat dishes for nasi lemak. This dish is actually originated from the Minangkabau ethnic group of Indonesia and it involves cooking the meat in spices, coconut milk and kerisik (toasted grated coconut in Malay) for several hours until dry. The slow simmering and then "frying" process makes the meat extremely tender and flavourful. I made a few minor changes and added some tamarind paste as seen at Bee's Rasa Malaysia. Time consuming, but so worth it.

Beef Rendang 7

It's even better the next day.

Ingredients: serves 4
  • 1kg beef - chopped into small chunks
  • 5 tbs cooking oil
  • 2 tsp tamarind paste
  • 1 cup warm water
  • 1 cinnamon stick
  • 3 cloves
  • 3 star anise
  • 3 cardamom pods
  • 1 can coconut milk
  • 6 tbs unsweetened dessicated coconut
  • 6 kaffir lime leaves (I used dried) - thinly sliced, you can soak the dried leaves in warm water to soften the leaves a little before slicing.
  • 2 dried bay leaves
  • 1 tbs sugar/palm sugar or to taste (I used black treacle plus 1 tsp sugar)
  • 1 tsp salt (or to taste)
Spice paste:
  • 5 shallots
  • 1 inch galangal
  • 5 cloves garlic
  • 1 inch ginger
  • 4 stalks lemongrass - white part only
  • 10 dried red chilies - soaked in warm water, seeded or not (your choice!)

Directions:
  • Soak tamarind paste in 1 cup of warm water for about 5-10 mins. Remove the seeds after the pulp is softened.
Beef Rendang 3
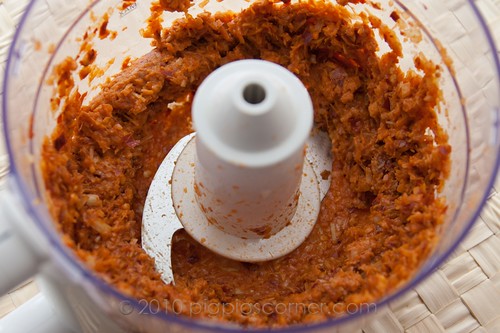
  • Roughly chop all ingredients for spice paste. Place everything into a food processor and blend until a paste is formed. I added about 2 tbs of oil to help the blending process.
Beef Rendang 2
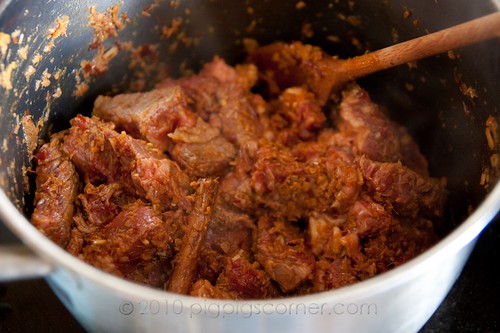
  • Add the rest of the oil to a large pot, add spice paste, cinnamon stick, cloves, star anise and cardamom pods. Fry until fragrant on low heat.
  • Mix in the meat.
Beef Rendang 4
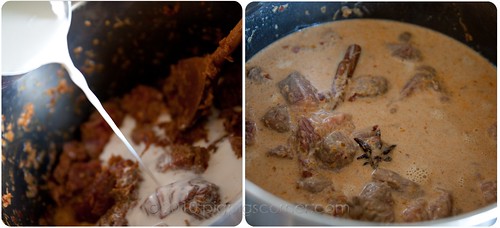
  • Pour in coconut milk, tamarind juice and simmer on medium heat, uncovered.
Beef Rendang 5
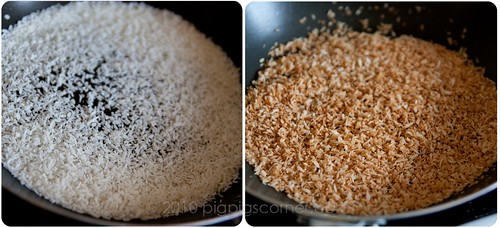
  • While meat is simmering, prepare the kerisik by adding the unsweetened dessicated coconut to a heated pan/ wok. Stir continuously until golden brown.
Beef Rendang 6
  • Add kerisik, kaffir lime leaves, bay leaves and sugar to simmering meat. Leave to cook for 1 1/2 hrs uncovered.
  • Turn the heat up to high and let it cook for a further 1/2 hr. Stir frequently.
  • The liquid should have almost evaporated off. When it has done so and the oil has separated, fry the beef in this oil, stirring so that it doesn't stick. It should be thick and very dark brown.

Beef Rendang 8
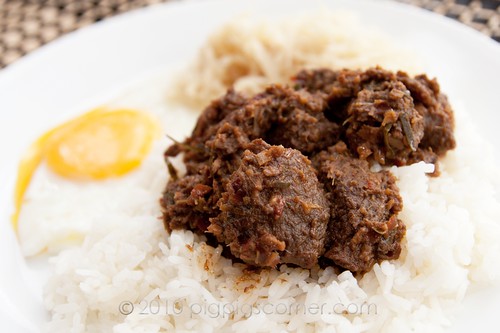
Beef rendang served with pandan flavoured rice, stir-fried pickled cabbage and a sunny side up.

Beef Rendang Recipe (Rendang Daging)

Recipe: Beef Rendang (Rendang Daging) or Spicy Beef Stew with Coconut
Ingredients:
1 1/2 pound boneless beef short ribs (cut into cubes)
5 tablespoons cooking oil
1 cinnamon stick (about 2-inch long)
3 cloves
3 star anise
3 cardamom pods
1 lemongrass (cut into 4-inch length and pounded)
1 cup thick coconut milk
1 cup water
2 teaspoons tamarind pulp (soaked in some warm water for the juice and discard the seeds )
6 kaffir lime leaves (very finely sliced)
6 tablespoons kerisik (toasted coconut)
1 tablespoon sugar/palm sugar or to taste
Salt to taste
Spice Paste:
5 shallots
1 inch galangal
3 lemongrass (white part only)
5 cloves garlic
1 inch ginger
10-12 dried chilies (soaked in warm water and seeded)
Method:
  1. Chop the spice paste ingredients and then blend it in a food processor until fine.
  2. Heat the oil in a stew pot, add the spice paste, cinnamon, cloves, star anise, and cardamom and stir-fry them until aromatic.
  3. Add the beef and the pounded lemongrass and stir for 1 minute.
  4. Add the coconut milk, tamarind juice, water, and simmer on medium heat, stirring frequently until the meat is almost cooked.
  5. Add the kaffir lime leaves, kerisik (toasted coconut), sugar/palm sugar, stirring to blend well with the meat.
  6. Lower the heat to low, cover the lid, and simmer for 1 – 1 1/2 hours or until the meat is really tender and the gravy has dried up.
  7. Add salt to taste. If not sweet enough, add more sugar to taste.
  8. Serve immediately with steamed rice and save some for overnight.
Cook’s Notes:
  1. To prepare the kerisik or toasted coconut, just add the grated coconut to a dry wok and stir continuosly until they turn golden brown.
If you like Indonesian or Malaysian cuisines, do check out Spittoon Extra’s roundup of “Waiter, there is something in my Indonesian.”

Adam Liaw's Malaysian Beef Rendang

These last few weeks, I’ve been working on a project with Malaysian Kitchen – a global initiative of the Malaysian Government celebrating Malaysian cuisine around the world.
So to celebrate Malaysian food, firstly, I decided to cook my favourite Malaysian dish – beef rendang.
(Actually, it’s my husband’s favourite dish. I’m just a very good wife.)
I used the recipe from the Two Asian Kitchens Cookbook by Australian Masterchef Winner Adam Liaw.
And let me tell you, it was really simple. So simple that my 6 year old son helped me.
I followed the recipe exactly too!
Malaysian Beef Rendang, Recipe By Adam Liaw
These are just some of the ingredients in the recipe.
I even bought an actual, fresh coconut – to grate, roast and pound. Ha how authentic is that!
That vulgar looking root at the front is a turmeric root. I’ve never seen one before! It stained my chopping board!
I thought I’d have a problem finding all the ingredients, but to my delight, my local fruit and vegetable shop stocked everything.
Malaysian Beef Rendang, Recipe By Adam Liaw
I chopped and sliced everything up, while my 6 year old son threw it into a food processor.
Ok I admit working with a fresh coconut was a bit time consuming and overrated in the end. Adam suggests that using desiccated coconut is just as good. And I’ll be doing that next time.
Malaysian Beef Rendang, Recipe By Adam Liaw
Using the fresh ingredients was absolutely worth it. The smell was already incredible and we hadn’t even cooked anything yet.
We threw the processed stuff into a pot.
Added meat, coconut milk, lime leaves, lemongrass.
Slow cooked it for 2 hours.
Malaysian Beef Rendang, Recipe By Adam Liaw
And look at that!
Absolutely, mouth-wateringly brilliant.
Everyone knows that brown meat curry doesn’t look good when photographed, so I left the pieces of lime leaves mixed with the meat to add a bit of visual interest. YUMMMM!!!
We fed a dinner party of 6 people, and they were all very, very happy indeed. I felt like such a culinary rockstar :)
.:.:..:.:.:..:.:.:..:.:.:..:.:.:..:.:.:..:.:.:..:.:.:..:.:.:..:.:.:..:.:.:..:.:.:..:.
Adam Liaw’s Malaysian Beef Rendang
Serves 4-6
Preparation: 30 minutes
Cooking: About 2 hours
Ingredients
1 tablespoon of oil
1kg of chuck steak, cut into 3cm cubes
3 stalks of lemongrass, white part only, bruised with a pestle
3 kaffir lime leaves shredded
2 teaspoons sugar
400 ml coconut cream
100g grated fresh coconut (or 130g desiccated coconut)
Base Paste
8 eschalots
6 red birds-eye chillies
6 garlic cloves
3cm piece of galangal (peeled and thickly sliced)
3cm of ginger (peeled and thickly sliced)
3cm of turmeric (peeled and thickly sliced)
2 teaspoon sea salt flakes
1. Base paste – Put all the ingredients in a food processor (or mortar) and grind to a fairly smooth paste.
2. Heat oil in a large saucepan and fry the paste, stirring often over medium heat for 5 minutes until fragrant.
3. Add beef, lemongrass, kaffir leaves and sugar and toss to coat in the paste.
4. Add coconut cream and 250mL of water and bring to low simmer. Cover and cook for 30 minutes, then uncover and cook for 1 hour.
5. Meanwhile, dry-fry the coconut in a frying pan until golden brown. Transfer to a mortar and grind to a paste.
6. Add the ground coconut and cook for 30 minutes, stirring often. Taste and adjust the seasoning. Serve with hot jasmine rice (or coconut rice).
I hope you enjoy it as much as we did!

Saturday, 27 April 2013

Blueberry Banana Yogurt Smoothie and Tips For Homemade Yogurt


Blueberry Banana Yogurt Smoothie, Drink, Spicie Foodie
Smoothies are one of my most favorite drinks. I love them for breakfast or as a mid-afternoon snack. Actually I could drink them any time of the day and during any season. Besides being delicious they are a great way of using up extra fruit. Let’s not forget how nutritious all those extra fruits are to our bodies. As long as we don’t add much sweetener or additional unhealthy ingredients, smoothies can be low in calories too.
Blueberry Banana Yogurt Smoothie, Drink, Spicie Foodie
Since I am not much of a sweet drinks person I hardly, if ever, add additional sweetener to my smoothies. Instead I prefer all the sweet and flavors to come from the fruit. But feel free to add as much or little sweetener to your smoothie.
Blueberry Banana Yogurt Smoothie, Drink, Spicie Foodie
It’s a bit silly giving you a recipe for smoothies, as it’s one of those foods/drinks made according to individual taste and preference. Regardless, I’ll give you a list of ingredients which you can adjust to your taste.
Blueberry Banana Yogurt Smoothie, Drink, Spicie Foodie
Blueberry Banana Yogurt Smoothie
1 Large banana
1 large handful of blueberries
120 g or 1/2 cup unsweetened plain white yogurt
pinch of Bourbon vanilla powder or splash of vanilla extract
Blend until smooth, serve and enjoy!
Blueberry Banana Yogurt Smoothie, Drink, Spicie Foodie
I made this smoothie using my homemade yogurt. It was before I strained it so it wasn’t as thick as Greek yogurt. Though Greek yogurt would be just fine. You may have to adjust the amounts to achieve the desired smoothie consistency.
Blueberry Banana Yogurt Smoothie, Drink, Spicie Foodie
Last week I posted my recipe for Homemade Greek Yogurt, and I’ve received some questions and problems regarding homemade yogurt. The most common problem people have with homemade yogurt is that it doesn’t set. If it happened to you, know that you are not alone. Yogurt making is a precise process that can quickly go wrong. But don’t let a failed attempt prevent you from attempting it again. Okay, let’s cover a few points.
Blueberry Banana Yogurt Smoothie, Drink, Spicie Foodie
Reasons why your homemade yogurt didn’t set:
- If the milk is too hot you will kill the yogurt cultures. Make sure after you’ve scolded the milk that it is allowed to cool down before adding the yogurt starter.
- Did you allow the yogurt starter to come to room temperature? It is important that the yogurt starter not be cold, because the yogurt cultures will not activate during the incubation time.
- Make sure the yogurt starter has a stamp or text guaranteeing live active yogurt cultures. Also be aware that different brands can have different amounts of cultures. Not all brands are created equal, and the quality of cultures can vary from brand to brand. It may be possible that you may need to experiment with a few before you find the right one. The quality of yogurt cultures can also dictate how long it will take for the yogurt to set. I’ve had one brand set in 4 while another took 10 hours. So you may need to allow longer incubation times.
- Were the yogurt starter and milk powder sugar free? Make sure both the yogurt starter and milk powder do not contain any sweetener or additional ingredients, like fruit in the yogurt. Sweetening and adding fruit should be done after the incubation and after the yogurt has set overnight.
- Do not use skimmed milk. You need the lactose sugar from whole or 2% milk to help the yogurt cultures activate. I never use anything but whole fat milk.
- Did you wrap the yogurt in a blanket and set to incubate in a warm place? This is very important, but make sure that the incubation spot isn’t too hot or too cold. In a colder space, or during cold months, the yogurt may need to incubate longer. In a warm place, or during warm weather, the incubation time is shorter.
- If you’re first attempt failed, you could try adding a bit more of the yogurt starter next time. Try using 2 heaping tablespoons instead of 1 tablespoon. Or another alternative would be to purchase a packet of active live yogurt cultures to use in place of the yogurt starter. The package instructions can guide you
- Remember that after the incubation period, and allowing to sit overnight, the yogurt will not be as thick as Greek yogurt. Thick Greek yogurt is the result of draining off the whey. If you want the thick Greek yogurt it needs to be drained.
Blueberry Banana Yogurt Smoothie, Drink, Spicie Foodie
The last thing I want to say is don’t give up after one failed attempt. Try again and just have fun with the process. Now if you’ll excuse me I must go check on my new homemade yogurt batch. Yum, can’t wait to have a taste.
Blueberry Banana Yogurt Smoothie, Drink, Spicie Foodie
Have a great weekend everyone!

Homemade Yogurt


Written by Emily, Contributing Writer
I've been making homemade yogurt for just about two years now, and I love the convenience, quality, and savings of making yogurt at home.
Yogurt is one of the most basic traditional foods, and even if you are just getting started with real food, including yogurt in your diet is an easy way to reap so many of the health benefits of cultured dairy. One of the main health benefits of yogurt, besides the protein, calcium, vitamins and minerals, are the probiotics.  Probiotics are the good bacteria that inhabit our guts and help to promote better digestion and increase our immune systems.
Yogurt is an easily digestible food, and even people who have trouble with lactose intolerance can often eat yogurt because most of the lactose has been "eaten" by the good bacteria during the culturing process.
Making homemade yogurt really is easy, but it can seem kind of overwhelming because it does have a lot of steps.  I'm going to walk you, step by step, through my method of making homemade yogurt, and after you've done it once or twice, you will be able to figure out what that works best for you and be able to provide your family with fresh made yogurt on a regular basis!

How to Make Homemade Yogurt Using a Crock Pot

Step 1: Turn your crock pot on low to let it heat up. It is important to remember to do this step first so you don’t forget, and so the crock pot is the right temperature when you’re ready to add the milk. Also, take your yogurt starter out of the fridge so it can warm up a little before you add it to your milk.
Step 2:  Pour your milk into a saucepan and heat over medium heat, stirring occasionally until it reaches 185 degrees. (I have used a candy thermometer I got for $10). You can choose the amount of yogurt that you want to make at a time - I usually make 6-8 cups of yogurt per week.  Be careful not to let the milk burn on the bottom of the pan during this step, and also make sure the milk doesn’t boil over – so stir often and keep an eye on it.
*Tip: I have stopped checking the temperature during this step. It’s just one less thing to have to do.  When the milk starts getting bubbly and frothy (or it boils over onto your stovetop) you know it’s done.
*During this step I usually get ready for step three by getting the sink of cold water ready.
Step 3: Once milk reaches 185 degrees (bubbling) remove from burner, cover with a lid, and place the pan in a sink half full of cold water. (This is kind of obvious, but make sure the water doesn’t go over the top of the pan, just part way up the sides.) You can add ice to the water as well, but I’ve found that it doesn’t really cool the milk down any faster.
Step 4: Let the milk cool down, stirring occasionally. Once milk has reached between 90 and 110 degrees (I’ve read different temps here, I usually do about 100 degrees), remove pan from water.  This usually takes just about 10 minutes for me, so set your timer, so you don't forget and the milk gets too cold.
*Tip: You can also do this step without a thermometer. After washing my hands, I stick my pinkie into the milk.  If it's painfully hot to the touch, I let it cool a bit longer.  If it's very warm, but not painfully hot, it is about the right temperature.
* While the milk is cooling, get ready for step 5
Step 5: Measure yogurt starter into a bowl (I use glass) and pour about a cup of the warm milk over it and stir together. Use 2 Tbsp of yogurt starter per 4 cups of milk. Meanwhile pour remaining milk into heated crockpot.  Pour milk and yogurt from bowl into the crockpot and stir it all together.
Step 6: Put the lid on, turn off, and unplug the crock pot. Wrap a heavy towel around it. Let sit for 6-10 hours. (I usually do around 8 hours).
Step 7: After the yogurt has finished culturing, place the crock in fridge to cool yogurt. I have found this step to be really important because it helps the yogurt to set better.  Since I started doing this my yogurt has been nice and thick and creamy. Don't stir or shake your yogurt, it needs to be disrupted as little as possible in order to set well.
When your yogurt has finished cooling and set, you can ladle it into a glass jar to keep in your fridge.  I hope you can tell in the picture that this is finished yogurt, it has set, and is definitely more "solid" than milk.  I have found that yogurt will keep for at least 7-10 days, and often it's still good at around 14 days, if there's any left of it by that point.

What is yogurt starter?

It is basically just yogurt.  You can use the yogurt you just made as starter for your next batch.  I usually set aside 1/2 cup of yogurt for starter into a separate small bowl right away, to keep the starter separate from the jar that we are dipping in to eat from every day, and also so we don't end up eating all the yogurt and I'm left without a starter!
You can also use store bought yogurt, of course, especially if this is your first batch of homemade yogurt or you feel like your homemade yogurt starter is getting weak.  Just make sure that your store bought yogurt is plain, unsweetened, with nothing added, and it should save "Live and Active Cultures" on the label.
Stephanie's note: Though I also generally do the same as Emily, starting with plain store bought yogurt and then saving some each time to make my new batch, you can also purchase yogurt starter cultures for some unique types of yogurt or just regular yogurt, from Cultures for Health. Once you've used these to get started, then you can continue to set aside your homemade yogurt for making more.
Our family's favorite way to eat homemade yogurt is with a drizzle of raw honey and fresh or frozen fruit. Yum!  It's also great with a sprinkle of nuts, or on top of homemade granola.

Monday, 22 April 2013

Easy Strawberry-Banana Smoothies

Easy Strawberry-Banana Smoothies


INGREDIENTS

1
container (6 oz) Yoplait® Greek Fat Free strawberry yogurt
1 1/2
cups skim milk
1
cup frozen unsweetened or fresh strawberries
1
medium banana, sliced (1 cup)

Step 1: In blender, place ingredients. Cover; blend on high speed about 30 seconds or until smooth.
Step 2: Pour into 2 glasses; serve immediately.

    EXPERT TIPS

    Be ready to make this easy, tasty smoothie by freezing ripe bananas ahead.
    Whether you are enjoying this smoothie for breakfast or dessert, a couple of fresh strawberries add the finishing touch.

    http://www.bettycrocker.com/recipes/easy-strawberry-banana-smoothies/f6113dc6-93ef-4417-9f42-7c20082c90b1?nicam4=SocialMedia&nichn4=Facebook&niseg4=BettyCrocker&nicreatID4=Post

    Yogurt


    Ayurveda Health Benefits of Freshly Made Yogurt

    Freshly made yogurt is filled with countless numbers of beneficial bacteria that help digestion and kill harmful viruses. The key here is fresh yogurt as compared to commercial store bought yogurt. According to The Council of Maharishi Ayurveda Physicians yogurt that has been sitting on the shelves at the grocery store does not have the fresh active bacteria that homemade yogurt does.
    Store bought yogurt is cold, heavy, difficult to digest and can cause the finer channels or shrotas of the physiology to become clogged. Also, once the yogurt has been refrigerated then the quantity of friendly bacteria decreases and thus the health producing benefits are less. Also, from the ayurvedic perspective, it may contribute to weight gain due to the cold and heavy qualities it has.
    To gain the benefits of yogurt bacteria choose products that contain live active cultures. If the yogurt has been pasteurized or heated at home, the bacteria are dead and will not provide benefits. Fresh yogurt is especially beneficial for individuals following a vegetarian diet since yogurt adds about 13 grams of protein (1 cup yogurt) as well as B complex, calcium (450 milligrams), potassium, phosphorus, and folic acid. People taking antibiotics (which can destroy lactic flora) are often advised to eat yogurt to replace the healthy bacteria. Fresh yogurt is digested in about one hour as compared to the three hours it can take to digest milk. Individuals who have trouble digesting milk may find that fresh yogurt is much easier to digest and actually aids in their digestion as well.
    Other health benefits from fresh yogurt include decreased bloating, relief of both constipation and diarrhea and other stomach disorders. Ayurveda recommends taking yogurt in the form of a drink known as lassi. This makes the yogurt even more light and digestible and helps in intestinal comfort after eating a meal. Ayurveda recommends making a batch of fresh yogurt to be consumed each day. According to ayurveda, yogurt should not be combined with milk or cream. Yogurt is the only "fermented" food recognized as saatvic by ayurveda. Yogurt, as a sour taste, is good for balancing Vata, but should be reduced by people on a Pitta or Kapha balancing diet.
    How to Make Yogurt
    There are many methods to make yogurt. You can buy an automatic electric yogurt maker, but you can easily make yogurt without one. To make one quart of yogurt, you'll need one quart of organic whole milk and 2 tablespoons of yogurt. Heat milk until it foams up. Turn off heat and allow it to cool to about body temperature. Just test the temperature with your finger, or if you use a kitchen thermometer, the milk should cool down to about 100 degrees. Pour the milk into a sterilized glass jar or ceramic bowl. Mix in the yogurt. Make sure the yogurt is at room temperature before you use it. Cover jar with lid and put in a warm place where there is no draft. For example, put the jar in an oven without the oven on but keep the oven light on. The light is just enough warmth that is needed to activate the yogurt. Do this in the evening and in the morning you will have fresh yogurt.
    • If you do not have an oven light then you can place the jar on top of a warm toaster oven that is set on the lowest temperature for about 6 hours or more. (Not in the oven but on top.)
    • Another method is to take a thermos and pour hot water into it for several minutes. Empty the water out and add the milk yogurt mix into the thermos. Cover and let stand overnight. In the morning you will have fresh yogurt. Save some of the yogurt from the new batch for your next batch.
    • The Salton Yogurt Maker is also a good way to make yogurt however one should leave the yogurt in less time than the instructions specify in order to keep the yogurt from turning sour. 3 hours makes great yogurt for lassi.
    Yogurt Recipes
    Beet Soup
    • 4 beets grated
    • 1 cup fresh yogurt
    • salt and pepper to taste
    In a quart of water, boil beets for about 45 minutes. Turn off the heat. Add the salt and pepper. Bring to room temperature and add yogurt. Stir well or add soup and yogurt to a blender. Serve at room temperature.
    Spinach with Yogurt
    items in cart: 
    sub-total: $0.00 
    view cart
     | check out
    Ghee made with Organic Clarified Butter more...
    28 oz. - (Item is unavailable)
    (Item is unavailable)
    13 oz. - (Item is unavailable)
    (Item is unavailable)
    • 1 lb spinach
    • 1/3 cup water
    • 2 tablespoons Ghee
    • 1/2 teaspoon fresh grated ginger
    • 1/2 teaspoon cumin seed
    • 1/2 teaspoon ground coriander
    • 1/2 teaspoon turmeric
    • 1/2 teaspoon salt
    • 1 cup plain yogurt
    Wash spinach, tear off stems and chop fine. Set aside. In a frying pan, heat Ghee and sauté spices gently for about one minute. Add spinach and stir for one minute. Add water and cook for about 5 minutes until spinach is well cooked. Fold in yogurt and serve warm as a side dish.
    Cucumber Salad 
    serves 4
    • 2 cups plain yogurt
    • 1/4 teaspoon salt and pepper
    • 2 tablespoons finely chopped fresh mint
    • 2 medium cucumbers, peeled, seeded, and diced
    Mix all ingredients well in a salad bowl. Allow the salad to sit for 30 minutes before serving.