Monday, 3 June 2013

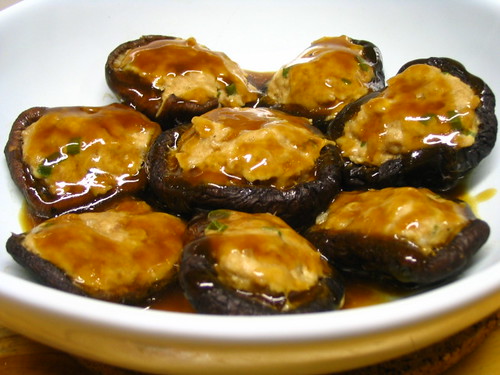
Serve Stuffed Shiitake Mushrooms as Appetizers

Stuffed Shiitake
Spring is in full swing and shopping for produce has become fun again. The aisles of my local grocer are lined with brightly colored fruits and vegetables and every trip holds the promise of finding something completely new and unexplored.
Stuffed Shiitake
But it isn’t always the new things that excite and inspire me. The other day, I found some gorgeous shiitake mushrooms with caps so thick that for a brief moment I thought I might be looking at baby portabellas. Were it not for the arresting aroma coming from the display, I may have moved on, but the savory scent of the mushrooms hooked me by the nose and drew me towards them.
Stuffed Shiitake
Back at home, I thought about chopping them up and throwing them in a stir-fry, but to desecrate these majestic brown caps seemed downright wasteful, and so I decided to use them whole. After much deliberation, I decided to stuff them with a Chinese-style pork filling similar to what I put into my baozi. It’s an incredibly flavorful filling made with pork, scallions and ginger, making it a good pairing for the pungent mushrooms
Stuffed Shiitake
These stuffed shiitakes make for a great appetizer individually, but they’re also substantial enough to make for a filling meal with a bowl of rice.

Stuffed Shiitake Mushrooms

stuffed-shiitake640x360
Add this incredibly flavorful filling made with pork, scallions and ginger, making it a good pairing for the pungent mushrooms from Marc Matsumoto in a full post on the Fresh Tastes blog.

Ingredients

  • 6 large shiitake mushrooms
  • 4 ounces ground pork
  • 2 scallions, white parts and green parts minced separately
  • 1 teaspoon fresh ginger, finely minced
  • 1 teaspoon sesame oil
  • 1 teaspoon oyster sauce
  • 1 teaspoon sake
  • 1/4 teaspoon sugar
  • 1/8 teaspoon salt
  • white pepper to taste
  • 1 tablespoon cornstarch
  • vegetable oil for frying
  • 1/4 cup water

Directions

  1. Remove the stems from the shiitakes. Use a damp paper towel to wipe the caps from the center towards the edges. Trim the stems of any dirt, and then mince the stems.
  2. Add the minced shiitake stems, pork, white part of scallions, ginger, sesame oil, oyster sauce, sake, sugar, salt and white pepper to a bowl. Put on some gloves and knead well.
  3. Divide the meat mixture into six balls, and then stuff each ball into a shiitake cap. Lightly dust the shiitake and meat filling with the cornstarch.
  4. Heat a frying pan with a lid over medium-high heat and add about two teaspoons of vegetable oil. Fry the meat side of the stuffed mushrooms until browned, then flip and fry the mushroom side for about the same amount of time. With the lid in one hand and the water in the other, carefully add the water and quickly cover with the lid.
  5. Steam until most of the liquid has evaporated (about 5 minutes). Remove the lid and let the remaining liquid thicken into a sauce, tossing to coat each stuffed mushroom. Plate the mushrooms and garnish with the minced scallion greens.
Yield: six stuffed mushrooms

Stuffed Mushroom with minced pork


Ingredients
Mushroom (soaked in hot water till very soft)-cut stem off
minced pork
minced water chestnuts
spring onion (chopped)
light soya sauce
seasame oil
cornflour
oyster sauce
water

Method
1. Soaked mushroom in hot water till very soft and cut stem off
2. Squeeze water out of mushroom, dust some flour on inside of mushroom.
3. Mixed evenly minced pork and water chestnuts and spring onion.
4. Stuff mushroom with the pork and chestnuts mixture.
5. Steam them for about 10 to 15 minutes till ingredients are cooked.
6. In a pan boil some oyster sauce with water and cornflour thickening and pour over mushroom.

Stuffed Chinese Mushrooms

I remember my mum making this dish. She would choose the biggest and fattest mushrooms, mix the pork filling by hand, stuff each mushroom and shape the top nicely, and steam the whole lot in her big wok.


Andy has never had this dish before but since he loves mushrooms I thought he would like it. And he did.

Stuffed shitake mushrooms

Ingredients (serves 2):

8 medium or large dried Chinese mushrooms
80g minced pork
1 stalk of spring onion, finely chopped

For the marinade:
1/4 tsp salt
1/4 tsp sugar
1 tsp light soy sauce
1/4 tsp Chinese rice wine (or dry sherry)
1/4 tsp sesame oil
Some white pepper
1/2 tsp cornflour
1 tsp water

For the sauce:
100ml mushroom water (from soaking the dried mushrooms)
1 tbsp oyster sauce
1 tsp dark soy sauce
1/2 tsp cornflour mixed with 1 tbsp cold water
1 tsp oil


Mix the minced pork and spring onions with the marinade and set aside for 30 minutes or longer (this can be done the night before). Reconstitute the dried mushrooms by soaking them in warm water for about 10 minutes. Gently squeeze out excess water from the mushrooms and reserve the water for the sauce.

Fill the mushrooms with the pork mixture, shaping it into a small mound. Place the stuffed mushrooms on a heatproof dish, stuffing side up, in one layer. Put the dish in a wok (with a trivet stand inside) or a steamer. Steam on high heat for 10 minutes with the lid on.

Just before serving, mix together the sauce ingredients (except for the oil) in a small pan. Bring to the boil and simmer, stirring continuously to prevent lumps as it thickens. Blend in the oil at the end to give it a nice sheen. Pour the sauce over the mushrooms and serve immediately.

Teriyaki Chicken Stuffed Mushrooms

Have you ever had Chinese-style baked stuffed mushrooms? When I was growing up, it was a popular appetizer at Chinese and tiki restaurants my family frequented. Usually filled with a sesame-accented pork filling that became caramelized in the oven, these bite-sized morsels were hard to resist.
With February designated as National Snack Food month, I decided to create a similar dish using Soy Vay® Veri Veri Teriyaki sauce, a thick flavorful sauce with plenty of sesame oil and sesame seeds. (I started my partnership with Soy Vay last month and have been experimenting with a few of their sauces.) Instead of pork, I decided to use ground chicken as a mushroom filling. For the flavoring, I just added minced ginger, scallions, and the Veri Veri Teriyaki sauce. You simply mix together the filling, fill up the mushroom caps, brush on a little olive oil, and sprinkle extra sesame seeds on top. Then the stuffed mushrooms bake in the oven for just 20 minutes.
The mushrooms make for tasty hor d’oeuvres for parties or just a side dish at dinner. You can also mix the filling and stuff the mushrooms ahead of time, and just pop them in the oven before serving. To test the seasoning of the meat mixture, just sauté a small bit of the filling in a skillet, and adjust accordingly with salt and pepper.
What are some of your favorite snacks or appetizers that use teriyaki sauce?
________________________________
Teriyaki Chicken Stuffed Mushrooms 
Serves 4 as an appetizer
  • 3/4 pound ground chicken
  • 2 teaspoons minced ginger
  • 2 scallions, thinly sliced
  • 3 tablespoons Soy Vay® Veri Veri Teriyaki sauce
  • 1 pound cremini or white button mushrooms
  • 3 tablespoons olive oil
  • 2 teaspoons white sesame seeds
  1. Preheat the oven to 350°F.
  2. Make the filling: In a small bowl, combine the ground chicken, ginger, scallions, and teriyaki sauce . Mix thoroughly; the filling should resemble a thick paste. Set aside.
  3. Remove and discard the stems from the mushrooms and wipe the caps with a damp towel. Fill the mushroom caps with about 1 tablespoon of filling. Pack tightly so that top of filling is rounded like a miniature dome. Place the stuffed mushrooms on the prepared baking sheet, cap side down. With a pastry brush, brush the top of the filling with olive oil. Sprinkle the sesame seeds on top.
  4. Bake for 20 minutes, until the meat is cooked through, the top of the chicken has browned, and the mushrooms are softened. (If you’re using large cremini or white button mushrooms and used more filling, it’s safer to bake for 25 minutes.)
  5. Remove from the oven and allow the mushrooms to cool for at least 5 minutes before serving. Serve warm or at room temperature.
________________________________

Raspberry and Apple Breakfast Slice with Oat Streusel

Some days, I miss eating grain and pasta dishes like this Curried Shrimps with Yuzu-Scented Turmeric Rice. Or thisProsciutto, Tomato, and Olive Pasta. Or these Green Pancakes with Lime-Cilantro Butter. But I’m not complaining, since I’ve got plenty of excellent alternatives!
No, I haven’t abandoned my Paleo ways. I stick to it on the week days, but I get to indulge sensibly during the weekends, which is when I do my blogging. And so, on one Sunday morning, this Raspberry and Apple Breakfast Slice was born out of a pantry-cleaning spree…Oh, it also comes with an Oat Struesel topping that’s irresistible. Fear not, this recipe can be made gluten-free with one simple substitution of the flour – no problem! Plus, it is not too sweet that you’ll feel guilty having it for breakfast!
But right now, I am in the mood for a cup of tea, a comfy blanket around my shoulders, a pair of socks warming my feet, maybe a nice fire kindling, and a slice or two of breakfast cake. Oh, and don’t forget the flowers. Oh, the flowers. They always brighten my day!
Raspberry and Apple Breakfast Slice with Oat Streusel
5.0 from 6 reviews
Print
Recipe Type: Breakfast, Snack
Prep time: 15 mins
Cook time: 25 mins
Total time: 40 mins
Serves: 12 servings
Ingredients
  • ~~ For the Raspberry Apple Breakfast Slice ~~
  • 140 grams (1-1/4 cups) cake flour (or substitute with gluten-free flour)
  • 50 grams (1/2 cup) almond flour
  • 60 grams (1/2 cup) caster or icing sugar
  • 6 grams (1 tsp) baking powder
  • 3 grams (1-1/2 tsp) ground cinnamon
  • finely grated zest of 1 lemon
  • large pinch of salt
  • 1 teaspoon pure vanilla extract
  • 115 grams (1 stick or 4 oz) unsalted butter, melted and cooled
  • 2 large eggs, at room temperature and lightly beaten
  • 120 ml (1/2 cup or 4 oz) lukewarm milk
  • 1/2 an apple, peeled, cored, and finely diced
  • 12 pieces of fresh raspberries, cut in half
  • ~~ For the Oat Streusel ~~
  • 30 grams (1/4 cup) all-purpose flour (or gluten-free flour)
  • 25 grams (scant 1/4 cup) old-fashioned oats
  • 25 grams (1/8 cup) light muscovado sugar
  • 0.5 grams (1/4 tsp) ground cinnamon
  • 0.25 grams (1/4 tsp) ground nutmeg
  • 30 grams (1/4 stick or 1 oz) unsalted butter, cold and cut into pieces
Preparation
  1. Preheat the oven to 400 F (205 C).
  2. Line a 12-cup muffin tin with paper or use a 12-rectangle silicone baking mat.
  3. Sift flour, almond meal, caster sugar, baking powder, cinnamon, lemon zest, and salt in a bowl and mix well.
  4. In another bowl, whisk together vanilla extract, cooled melted butter, beaten egg, and milk by hand or with an electric mixer fitted with a paddle attachment.
  5. Add the wet ingredients to the dry and mix well with a spatula.
  6. Gently fold in the diced apples until just combined.
  7. Spoon the batter three-quarters up into the prepared pan. Or to fill the rectangular baking mold, spoon the batter in a piping bag fitted with a plain, round tip and pipe to three-quarters full.
  8. To prepare the oat streusel, combine all the ingredients for the streusel in a bowl and mix with your fingers. Alternatively, you can use an electric mixer fitted with a paddle and mix on low until combined and no large chunks remain.
  9. Place two raspberry halves on top of the batter, then top with the prepared oat streusel.
  10. Bake for 20 to 25 minutes, or until a tester inserted in the centre comes out clean.
  11. Let rest on the pan for 10 minutes before turning out into a rack to further cool.

Slow Cooker Italian Meatballs

Slow Cooker Italian Meatballs
Looking for a great appetizer, these slow cooker Italian Meatballs are delectable.
These meatballs are a family favorite. They are so versatile. They can be serve as an appetizer or along with your favorite pasta.
Slow Cooker Italian Meatballs
The longer your sauce simmers, the more robust its flavor.
The better the marriage of spices and herbs. And since we all  know that the slow cooker is a great way to cook meat, these meatballs are very tender.
Slowly simmered and cooked directly in your favorite sauce these meatballs are simple. They’re perfectly moist and tender, while still holding their shape.
Slow Cooker Italian Meatballs
It’s not going to get much easier than this.
These meatballs will sure be a big hit.
The slow cooker can be your best friend when you don’t have a lot of time to spend in the kitchen.
SLOW COOKER ITALIAN MEATBALLS
Author: 
Ingredients
  • 1½ pounds extra-lean ground beef
  • 1 cup dry breadcrumbs
  • 2 eggs
  • ¼ cup milk
  • 1 teaspoon onion powder
  • 1 tablespoon Italian Seasoning
  • ⅓ cup chopped fresh parsley
  • 2 tablespoons minced fresh onion
  • 2 Tablespoons ketchup
  • 2 tablespoons brown sugar
  • ⅓ cup ketchup
  • 1 teaspoon balsamic vinegar
  • 1 (12-ounce) bottle chili sauce
Instructions
  1. Combine first 9 ingredients in a large bowl; shape mixture into 30 (1½-inch) meatballs.
  2. Combine ketchup, sugar, balsamic vinegar, and chili sauce, in an electric slow cooker; gently stir in meatballs. Cover with lid; cook on low-heat setting for 8 to 10 hours. Garnish with parsley, if desired.


Slow Cooker Italian Meatballs

LIME AND HONEY GLAZED CHICKEN


There is something very appealing about sweet, sticky chicken. I am guessing it is the way the chicken skin holds the glaze or the way the fat exuding out of the chicken blends with the flavours of the seasoning or the way the meat comes out juicy and tender when sealed with a sticky coating. 

This chicken dish is flavoured with lime, honey and soy sauce. It is briefly pre-cooked so that the seasonings are absorbed into the chicken. It is finished off in the oven and brushed with honey to create that sticky, sweet glaze.


Ingredients:

8 chicken thighs
juice and grated rind of 1 lime
1 tsp. sesame oil
3 tbsps. light soy sauce
1 tsp. salt
3 tbsps. honey
1 tbsp. butter

Method:

Put the chicken thighs in a pan and season with the lime juice and rind, sesame oil, 2 tbsps. of light soy sauce and salt. Leave to marinate for half an hour. 

Pre-heat the oven to 350° F/ 180° C. 


Bring the chicken and marinade to a boil. Simmer gently for ten minutes. Take the chicken out of the cooking liquid, and arrange in a single layer on a baking dish. Reserve the sauce. 


Bake, skin side up, for 15 minutes. Turn the chicken over and bake for a further ten minutes. Turn the chicken over again and brush the skin liberally with a mixture of 1 tbsp. light soy sauce, 3 tbsps. honey and 1 tbsp. butter. Pour the reserved sauce around the chicken to deglaze the baking pan. Bake for a further ten minutes or until the chicken is browned. Transfer the chicken into a serving dish. 


Pour the sauce back into the pan, add the remaining glaze (if any) and reduce until syrupy. Pour some over the chicken and serve the rest on the side as sauce.