Thursday, 28 February 2013

Lemon Cheesecake Bars


1

Preparation Time 
15 minutes
Cook Time 
45 minutes
Refrigeration Time 
4 hours


Calories:198   Total Fat:14g
Cholesterol:63mg   Protein:3g
Carbohydrates:15g   Sodium:159mg

Serves 
24 servings

Notes, Tips & Suggestions 
Flavor Variations: Prepare as directed. Use 1 1/2 teaspoons McCormick Pure Orange Extract or 2 teaspoons McCormick Raspberry Extract in place of the Lemon Extract.
Source
McCormick
Related Articles
Spring Flavor Inspiration


Ingredients
  • 1 1/2 cups graham cracker crumbs
  • 1/3 cup butter, melted
  • 1/2 teaspoon McCormick Ground Ginger
  • 3 packages (8 ounces each) cream cheese, softened
  • 1 cup sugar
  • 1/4 cup milk
  • 2 tablespoons flour
  • 1 1/2 teaspoons McCormick Pure Lemon Extract
  • 1 teaspoon McCormick Pure Vanilla Extract
  • 3 eggs

Preparation 
    1. Preheat oven to 350°F. Mix graham cracker crumbs, butter and ginger. Press firmly onto bottom of foil-lined 13 x 9-inch baking pan. Refrigerate until ready to use.
    2. Beat cream cheese and sugar in large bowl with electric mixer on medium speed until well blended. Add milk, flour and extracts; mix well. Add eggs, 1 at a time, beating on low speed after each addition, just until blended. Pour over crust.
    3. Bake 40 to 45 minutes or until center is almost set. Cool completely on wire rack.
    4. Refrigerate 4 hours or overnight. Lift out of pan onto cutting board. Cut into bars. Garnish as desired. Store leftover bars in refrigerator.

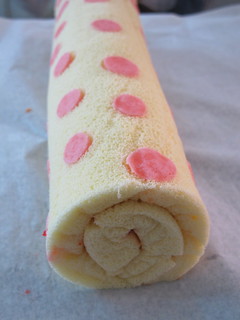
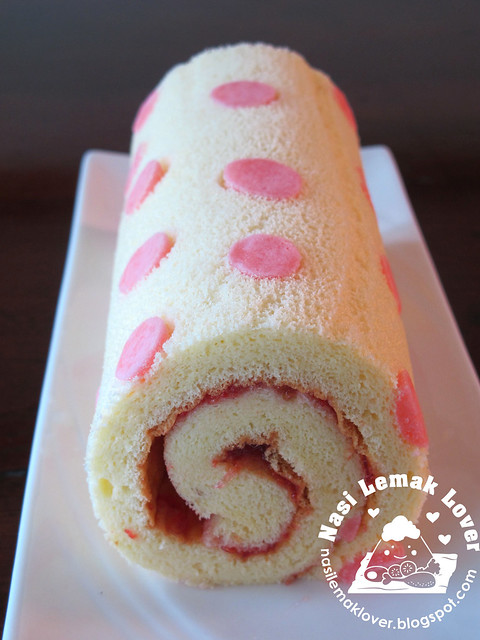
Decorated Polka Dot Swiss Roll 圆点蛋糕卷


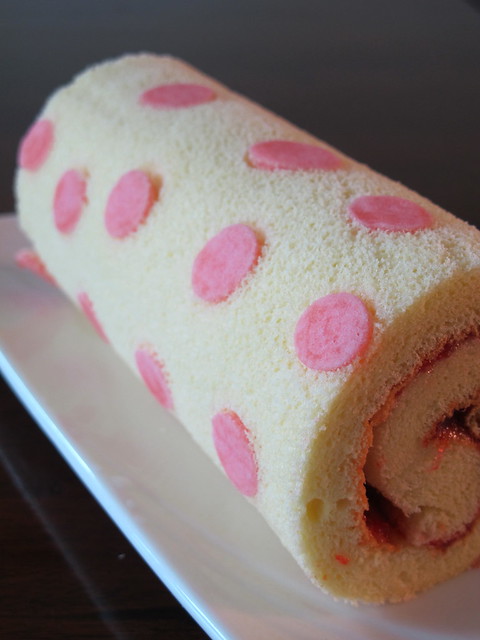
I did swiss roll before but have never try with decorated pattern on swiss roll. Since i bought a decorated swiss roll cookbook ( 彩绘蛋糕卷 ) from the Book Fair recently .So i quickly try my 1st decorated swiss roll with the most basic pattern, polka dot.


IMG_6333 copy

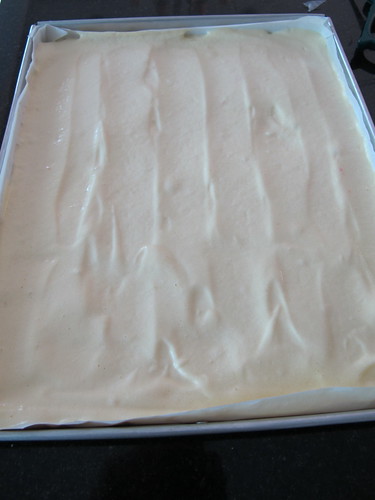
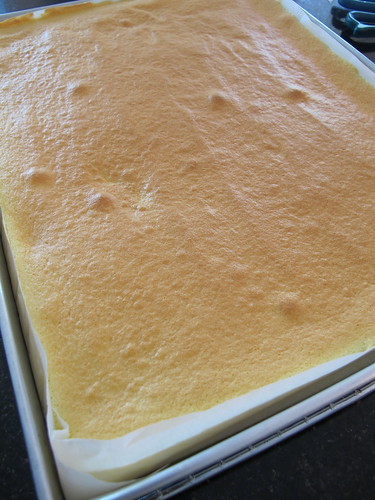
But i did not follow to the sponge cake recipe in this book or followed to the earlier 孟老师 recipe, instead i follow a recipe from my favourite cookbook that i bought from Shanghai. I am very pleased with this sponge cake recipe, easy to make (making chiffon method) and yet resulted a spongy and flexible swiss roll cake. I will use this basic swiss roll recipe from now onwards..


IMG_6323

IMG_6324

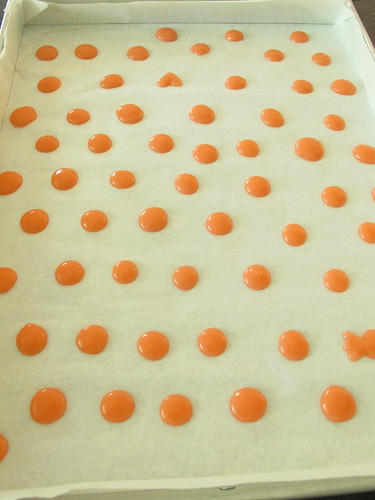
While i went out to fetch my son who having tuition in school, i let my daughter to pipe the patterns for me. So this was how she made the polka dot, not same size and you can noticed she pipe a heart shape also, hehehe..

IMG_6322


IMG_6335


Decorated Polka Dot Swiss Roll
*35.5cm x 28cm square pan

Decoration batter
(recipe source: adapted from 彩绘蛋糕卷 )

50g unsalted butter
1tsp corn oil
40g icing sugar
30g egg white
50g cake flour, add more flour if batter too runny, adjust accordingly

Food coloring, Wilton rose

Method
1. Melted butter and corn oil over a double boiler.
2. Sift in sugar, stir well.
3. Add in egg white, combine well.
4. Add in cake flour, mix well.
5. Put in the color.
6. Pipe the patterns onto the swiss roll pan that line with paper.
7. Chill in the fridge for 20mins.

Swiss roll sponge
(recipe source: adapted from 妙手烘培)

5 egg yolks (medium)
IMG_632750g corn oil
50g milk
20g caster sugar
85g cake flour

5 egg white (medium)
1/4tsp lemon juices, optional
60g caster sugar

Method
1. Lightly whisk egg yolk with sugar.
2. Add in corn oil, stir to combine.
3. Add in milk, combine well.
4. Fold in cake flour, mix well, set aside.
5. Add lemon juices into egg white, beat till foamy.
6. Gradually add in sugar, beat till stiff peaks (十分发 / 硬性发泡)
7. Take 1/3 portion of egg white mixture and use hand whisk to mix with egg yolk mixture till light.
8. Fold the balance of egg white mixture into egg yolk mixture, combine well.
9. Pour batter into the pan that line with parchment paper.
10. Bake at 160C (at middle rack) for 25mins.

To assemble Swiss roll
1. Carefully turn the baked sponge cake onto a piece of baking/parchment paper.
2. Slowly peel off the attached baking/parchment paper from the cake.
3. Place a new piece of baking/parchment paper over the sponge. Invert the sponge again.
4. Slice out a small piece of sponge on a 45-degree angle at another end, so the end of sponge will neatly attached to the sponge at the end of rolling.
5. Make few slits on the whole cake. Spread evenly a layer of strawberry jam or cream.
6. With the shorter side/breadth facing you, roll the cake up tightly to form a swiss roll. Wrap with cling wrap and chill in the fridge (if using whipping cream) to allow the swiss roll to set. Slice to serve.

There will be more patterns coming up, stay tuned..


IMG_6356

Easy Ham & Swiss Crescent Roll-ups


A friend of mine shared with me a super easy Ham & Swiss Crescent Roll-up recipe that the whole family will love especially the kids! I had the opportunity to test it out at lunch today and let me tell you, these were the best Crescents I have ever had! It’s also great to find a recipe that you do not have to force your stubborn 2 year old to actually eat, this is why I am sharing this easy recipe with you!
(fair warning… they are addicting)

Easy Ham & Swiss Crescent Roll-ups

Ingredients:
1 Package of Crescent Rolls
4 slices of Swiss Cheese
8-16 slices of Ham (depends on thickness of slices)
Directions

On an ungreased cookie sheet roll out the crescent dough. Take slices of the ham and place a slice or two on each triangular piece of dough. Try and keep the ham in a triangular shape inside the dough to keep it from burning.

This is where you split the cheese in half but make sure to split it triangularly to easily place it on top of the Ham and Crescent.

Now you roll the Ham & Swiss Crescents up in to a crescent shape if possible. Bake on 350 for roughly 10-15 minutes making sure they do not burn.

These are best paired with a hearty tomato soup! Enjoy!

Soft Bun


Even after the failure of previous 2 attempts on bread making, I do not intend to give up. Although felt very dishearten after each failure and told myself probably will start bread making only if I get a heavy duty mixer or bread machine. However, when seeing the soft and fluffy breads that baked by other bloggers, my heart will be bouncing actively that asking me to give another try, give a last try, dun give up so easily!

When I saw this post from Happy Home Baking and the sentances caught my attention "After kneading continuously for 30mins or so, my fingers, which were initially covered with dough miraculously came clean. The dough was really smooth and elastic, and I could even stretch it fairly thinly!" I was so excited, my urge of bread making was awake again. Both of my previous kneading of dough took more than 1 1/2 hrs and still not able to reach the windowpane test. So this recipe is definately a must to try since it took only 30 mins or so to knead the dough! I immediately bookmarked the recipe.


My dear daughter again, finished all the fresh milk so I had no choice to use chocolate milk instead so my buns came out in light brown color.


The dough was very very sticky that I had to use the dough scraper to help me to remove the sticky dough from table top or hand. I knead for more than 30 mins, the dough was still as sticky that I had to dust some flour. During the next hour of kneading, I dusted another 3 times of flour to get non-sticky dough finally.


I am not sure was it my method of kneading the dough is incorrect or due to other reason. I actually took more than 1 1/2 hrs to knead the dough and it didn't even reach the stage as what HHB mentioned that her dough was really smooth and elastic that she can even stretched it fairly thin. However, for the 3 times experience of dough kneading and all took more than an hour, this was the 1st time that the dough can stretched thinner before it tears.

Although it still did not pass the windowpane test but I stopped the kneading cos I was darn tired, shoulder and hands were aching (old aunty liao so body can't take the overwork :P). And I was running out of time, I need to go to my mum's place for weekly visit. So I just let the dough rest in the mixing bowl for proofing and brought it over to my mum's place for baking.


I was thinking, gosh I am going to fail again, the bread can't be soft after dusting so many times of flour and also never pass the windowpane test again. Well, I still went ahead with the baking since my guinea pigs are always so supportive. They finished the dense bread that I had produced previously and my sis even praised on my charred butter roll crisp bread :P.

As I thought this will be another failure, I dun even bother to prepare the tuna filling. I just shaped the dough into 10 balls and filled 6 balls in the 7" cake pan. For the balance 4 balls, 2 balls topped with cheese and ham, I wrapped the cheese and ham in the dough for the balance 2 balls.


I was afraid to get a charred bread again, so I monitored the baking closely. Since I am not sure how to check the doneness of bread, when the baking time was up, I just removed the buns from the oven.

I can't wait to try the bun even it was so so hot when just out from oven! I tore the cheese & ham bun into half, I saw the fluffiness texture, I was so excited but I still need final confirmation by tasting it. I quickly bite onto the bun, my smile just floated on my face instantly and I felt so satisfied. I got everyone to try the buns and kept telling them "very soft hor!", they nodded and totally agreed with me.
Horray!!! Finally I made it! :)


Recipe from HHB that she adapted from Smile!幸福小点心, 山王丸由利绘

Ingredients : (makes 10 buns)
200g bread flour
20g caster sugar
1/2 teaspoon salt
3g (about 1 teaspoon) instant yeast
110ml chocolate milk (room temperature)
30g egg, light beaten (this amount is less than one egg so I chose the smallest egg, use the leftover as egg wash)
25g unsalted butter, room temperature

Method:
1. Stir bread flour, caster sugar, salt, and instant yeast in a mixing bowl.
2. Add in milk and egg. Mix the ingredients with hand and slowly form into a rough dough.
3. Transfer dough to a lightly floured work surface. Knead the dough till smooth. This should take about 10mins. (I took about 30 mins)
4. Knead in the butter. Continue to knead the dough until it no longer sticks to your hand, becomes smooth and elastic. This should take about another 15 to 20 mins (I took about 1 hour). Do the window pane test: pinch a piece of the dough, pull and stretch it. It should be elastic, and can be pulled away into a thin membrane without tearing/breaking apart easily. (I didn't reach this stage, my dough still able to stretch fairly thin (for me lah since compared to my previous attempts) but tore when stretched it further).
5. Place dough in a lightly greased (use vegetable oil or butter) mixing bowl, cover with cling wrap and let proof in room temperature (around 28 to 30 degC) for about one hour, or until double in bulk.
6. Remove the dough from the bowl and give a few light kneading to press out the gas in the dough. Divide into 10 equal portions, about 40g each. Roll into rounds. Cover with a damp cloth or cling wrap and let the doughs rest for 10mins.
7. Fill in your desire fillings and transfer dough to cupcake casing or greased cake pan.
8. Brush surface with egg wash. For baking in cake pan, space out the doughs to allow room for the doughs to expand. Cover with damp cloth or cling wrap and leave doughs to proof for the second time for about 30 ~ 40mins, or until double in size.
9. Bake in pre-heated oven at 180 deg C for 12 mins or until golden brown. Remove from oven and let cool completely before storing in an airtight container.

Verdict?
The buns were surprisely soft and fluffy even I was not able to achieve the windowpane test. The bun was tasty when eating in plain but tasted good when spread with butter or the filling with cheese & ham! My family given thumbs up and next morning, I toasted the cheese & ham bun to let dear husband and mil tried and they said soft and delicious. As what HHB said, this recipe is a keeper for sure.

Credit: http://bakericious.blogspot.com/2010/07/soft-bun.html

Breadcup Quiche


I saw there were 2 unfinished pack of bread (left about 1/2 loaf) inside the fridge and 1 loaf on the kitchen table. I know that these bread going to stay inside the fridge for a period and the final fate will be dumped inside the trash bin. Thus after going through my collection of recipes, I found this recipe from My Culinary Journal that caught my attention so I went ahead without hestitation. I just used 7 slices of white & wholemeal bread for trialing.


Ingredients :
7 slices bread (white or wholemeal)
1.5 cup milk
3 eggs
2 slices ham
some grated cheese
a dash of salt
a dash of pepper

Method :
1. Trim the crust of the bread away.
2. Grease the muffin tray.
3. Roll the bread thinner and make 4 slits and stuff into muffin holes.
4. Whisk eggs with a cup of milk, season with salt & pepper.
5. Add in bits of ham and pour onto breadcups, sprinkled with grated cheese.
6. Bake at 180 degree for 25 to 35 mins till golden, fluffy or to your liking.

Verdict?
This is simple and delicious, a good way to use up the unfinish bread. Beside adding ham, we can add other ingredients like sausage, bacon, tuna etc, anything you like.

Credits: http://bakericious.blogspot.com/2010/04/breadcup-quiche.html

Non Bake Oreo Cheesecake


I supposed to post the birthday cake that I had made for my grandma, a Banana Custard Ice Cream Cake. So sad that I was not able to trace the photos in the memory card, dunno what's went wrong :(.

This cake was an order from my best friend M's colleague, the 1st cake order that I have accepted. There were many people asking about ordering cakes from me but I always laugh it off as I am not sure whether are they joking or serious about it :P.

M has been "boast' about how nice and delicious my bakes was to her colleague E. So E asked me through M whether can I bake a birthday cake for him. Since I thought I will be available and E was seriously requesting for it so I agreed to take up this order.


I didn't know the date was crashed with my mooncake making, dunno why I do not have much mood to make mooncake this year compare to last year (probably cos last year was the first time making mooncakes so full of enthusiasm) but still dragged myself to do so to fullfil my promises. Since I had tight schedule so I decided to make a non bake cheesecake which I can save some of the times on frosting of cake.

I made a non bake oreo cheesecake that I had made many times due to the great responses. My pipping and decoration skill still has not got any improvement, guess I must be more hardworking to practise more :P. Hope E won't mind it and will like this cake.

Recipe adapted from Aunty Yochana.

Biscuit Base:
100 gm Digestive Biscuits - crushed with roller
50 gm melted butter

Mix them together and press into an 8" springform tin. Chill it.

Cream Cheese Filling:
250 gm Cream cheese
50 gm Icing sugar
1 Tbsp Maple Syrup (I can't find my maple syrup so I replaced with manuka honey)
60 ml milk
1/4 tsp vanilla extract
10 Oreo cookies - chopped coarsely
260 ml whipped cream - whipped till medium peak
1 Tbsp gelatine powder + 70 gm water

Some extra crushed Oreo Cookies for sprinkling on top

Method:
1. Measure water into a bowl and sprinkle in the gelatin (without stirring with a spoon). Set aside to allow the gelatin grains to swell (10 mins) before setting the bowl over a pot of simmering hot water. Stir with a spoon and once the gelatin melts, remove the bowl from the pot and set aside to cool to room temperature)
2. Beat cream cheese with icing sugar till well combined.
3. Add in fresh milk and mix till well combined. Add in gelatine mixture and mix well.
4. Fold in whipped cream and divide mixture into 2 portions.
5. Fold in chopped Oreo cookies into 1 portion and maple syrup or honey and vanilla extract into the other portion.
6. Pour in the white portion into the chilled biscuit base. Level the cream cheese filling and put it into the fridge to let it set.
7. Pour the Oreo cream cheese filling onto the set white cream cheese and level it.
8. Put into the fridge to let it set for 2 to 3 hours. (I put in freezer to have ice cream alike texture)
9. Remove from freezer to decorate as desire and put back to freeze it.
10. Slice and serve chilled

Credit: http://bakericious.blogspot.com/2010/09/non-bake-oreo-cheesecake.html

Monday, 25 February 2013

Almond Flour Zucchini Bread


Paleo Zucchini Bread

this giveaway has now ended. please see below for the zucchini bread recipe.


Who is ready for another giveaway?!
The lovely folks over at Digestive Wellness have offered to give one lucky reader a 5 pound bag of their SUPER FINE blanched almond flour as well as a 2 pound bag of their Organic Coconut Flour.
If you’ve read my Almond Flour page, you know that I ♥ Digestive Wellness’s products. I came across their site a few years back when I was first starting the Specific Carbohydrate Diet and they’re not kidding when they call themselves the “SCD Superstore.” The Paleo and SCD diets take a lot of prep work and time in the kitchen, and this site is amazing for those of you who don’t have that time. They offer pre-made baked goods, nut flours, and even Paleo/SCD compliant condiments.
Their superfine blanched almond flour is like no other. It’s finer than any other one I’ve tried, and works wonders in baked goods. You may not think the type of almond flour you use matters, but you will notice a huge difference once you try it. You breads will rise better and you will no longer have slightly soggy muffins. The consistency is the closest to white flour grain-free can get!
Try it in this yummy zucchini bread recipe and then see the bottom of the post for the giveaway rules!
Grain-Free Zucchini Bread - from Against All Grain


Ingredients (makes 2 mini loaves)
1-1/2 cup blanched almond flour
2 teaspoons cinnamon
1 teaspoon baking soda
1/2 teaspoon salt
1/2 teaspoon nutmeg
3 eggs, beaten
1/4 cup honey
1 ripe banana
1 cup shredded, unpeeled zucchini 
Directions
Preheat oven to 350 degrees Farenheit.
Combine the dry ingredients in a small bowl.
Place the wet ingredients in the bowl of a stand mixer, then beat on medium for 1-2 minutes until frothy and fully combined. Add the zucchini and beat again just enough to incorporate.
Slowly add the dry ingredients with the mixer running, until all of the flour mixture has been incorporated.
Spoon the batter into 2 mini loaf pans. You can also use this batter to make muffins.
Bake for 30-35 minutes until the middle is set and a toothpick comes out clean.
Enjoy!

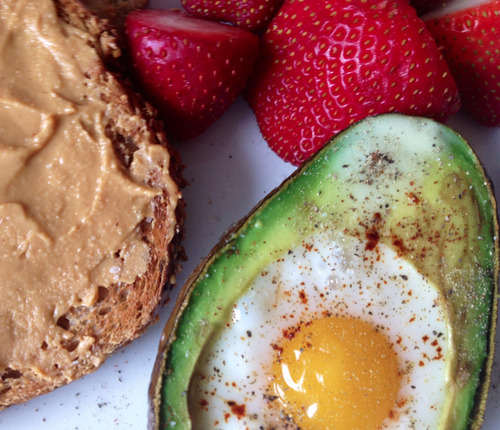
Eggvocado (Baked egg in an avocado)


Ingredients:
  • 1/2 avocado, ripe
  • 1 egg 
  • Salt and pepper to taste
  • Optional seasonings: Paprika, chili powder, oregano, chilli flakes, etc.
Preparation:
  • Pre-heat oven to 375 degrees farenheit.
  • Cut avocado in half and remove pit. Enlarge the pit by scooping some avocado from the edges. 
  • Use a baking dish and place the avocado in it.
  • Crack the egg into the pit of the avocado. It’s okay if the egg over-flows onto the top of the avocado or into the baking dish
  • Sprinkle salt, pepper and optional seasonings
  • Bake for ABOUT 15 minutes — you want the whites of the egg to be cooked thoroughly). *Note - if you leave it in the oven too long the avocado’s texture becomes too mushy. 
Enoy!
Health is Happiness.
XO!

Chocolate Chip Dip Recipe


Chocolate Chip Dip Recipe 

Ingredients:
1 package (8 ounces) cream cheese, softened
1/2 cup butter, softened
3/4 cup confectioners' sugar
2 tablespoons brown sugar
1 teaspoon vanilla extract
1 cup (6 ounces) miniature semisweet chocolate chips
Graham cracker sticks

Directions:
In a small bowl, beat cream cheese and butter until light and fluffy. Add the sugars and vanilla; beat until smooth. Stir in chocolate chips. Serve with graham cracker sticks. Yield: 2 cups.

Nutritional Facts
2 tablespoons (calculated without graham cracker sticks) equals 180 calories, 14 g fat (9 g saturated fat), 31 mg cholesterol, 84 mg sodium, 14 g carbohydrate, 1 g fiber, 2 g protein.

Recipe from Taste of Home

Bacon-Wrapped Asparagus


Bacon-Wrapped Asparagus 

Ingredients:
10 fresh asparagus spears, trimmed
1/8 teaspoon pepper
5 bacon strips, halved lengthwise

Directions:
Place asparagus on a sheet of waxed paper; coat with cooking spray. Sprinkle with pepper; turn to coat. Wrap a bacon piece around each spear; secure ends with toothpicks.

Grill, uncovered, over medium heat for 4-6 minutes on each side or until bacon is crisp. Discard toothpicks. Yield: 2-3 servings.

Nutritional Facts
1 serving (5 each) equals 222 calories, 22 g fat (8 g saturated fat), 25 mg cholesterol, 281 mg sodium, 2 g carbohydrate, 1 g fiber, 5 g protein.

Recipe from tasteofhome

Tuesday, 5 February 2013

Carrot and Zucchini Bars with Lemon Cream Cheese Frosting


So for today’s zucchini recipe I tried a dessert.  It is the only way I can get my family to eat zucchini.  It has to be in something sweet like cakes, muffins, breads, etc.  I like the idea of making something with both zucchini and carrots in it.  These bars were a fun change.  I loved the ginger in them and the lemon frosting!  These bars are full of texture.  I did not peel my zucchini because I wanted to see the color, but you could always do that if you need it to be hidden!
Carrot and Zucchini Bars with Lemon Cream Cheese Frosting
  • 2 eggs, slightly beaten
  • 3/4 cup packed brown sugar
  • 1/2 cup canola oil
  • 1/4 cup honey
  • 1 tsp vanilla
  • 1 1/2 cups shredded carrot
  • 1 cup shredded zucchini
  • 1/2 cup chopped walnuts
  • 1 1/2 cups all-purpose flour
  • 1 tsp baking powder
  • 1/2 tsp ground ginger
  • 1/4 tsp baking soda
Lemon Cream Cheese Frosting
  • 1 (8 oz) pkg reduced fat cream cheese
  • 1 cup powdered sugar
  • 1 1/2 tsp lemon zest
  1. Preheat oven to 350 degrees F. In a large bowl, whisk together the eggs, brown sugar, oil, honey, and vanilla.  Don’t worry about clumps of the brown sugar, those will dissolve as it sits while you prepare the remaining ingredients.  Then fold in the carrot, zucchini, and walnuts
  2. In another bowl combine add the flour, baking powder, ginger, and baking soda.  Whisk to blend together.
  3. Add to flour mixture to the wet mixture. Stir just until combined. Spread batter into an ungreased 13x9x2-inch baking pan.
  4. Bake about 25 minutes or until a toothpick inserted in center comes out clean. Cool completely in pan on a wire rack.
  5. Once the cake is cooled prepare the frosting.   In a medium mixing bowl, beat the fosting ingredients with an electric mixer on medium speed until fluffy.  Spread or pipe the frosting over the cooled bars.  Makes 36 bars.