Wednesday, 8 May 2013

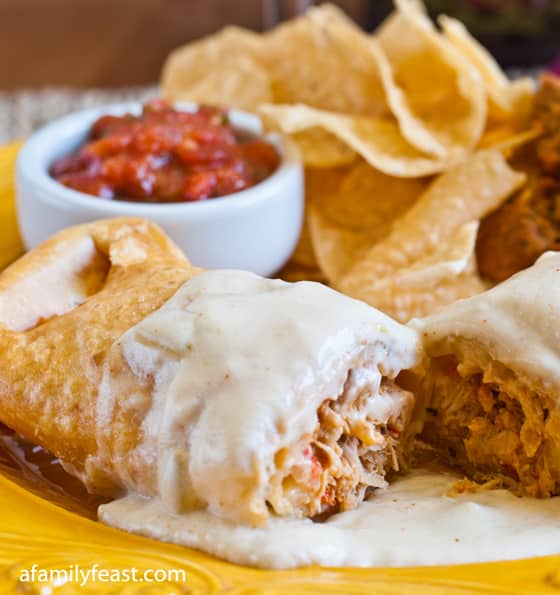
Chicken Chimichangas


Chicken Chimichangas
Bulldog clips are preferred over binder clips for this recipe because they have a flat surface that would pinch the tortilla end without leaving an impression in the tortialla. But binder clips will work in a 'pinch' (ha ha)!
We couldn’t find the correct size bulldog clips so we used the binder clips in our version picture here. Either way, it doesn’t affect the taste of the finished chimichanga and both kinds of clips do a great job holding the tortilla closed during the frying process.
Prep Time: 25 minutes        
Cook Time: 5 minutes     
 Total Time: 30 minutes
Yield: 4 servings
Ingredients
  • ¼ cup butter (4 tablespoons)
  • ¼ cup flour
  • 2 cups chicken stock, heated
  • 8 ounces sour cream
  • 4 ounce can chopped green chilies, drained
  • ¼ teaspoon cayenne powder
  • 1 teaspoon or more of Rocket Fuel, or your favorite hot sauce
  • 4 flour tortillas
  • 8 ounces Mexican Pulled Chicken
  • 4 ounces Monterey Jack cheese, shredded
  • 4 ounces Pepper Jack cheese, shredded
  • Vegetable oil for cooking
  • 1 1/2 to 2 inch Stainless steel bull dog clips or binder clips (available in any office supply store)
Instructions
  1. Preheat the oven to 250 degrees.
  2. In a medium sauce pan over medium heat, melt butter and add flour. Stir and cook for 3-5 minutes or until the raw flour smell is gone.
  3. Add heated chicken stock 1/3 at a time stirring with a wire whip for each third. This step will ensure no lumps.
  4. Add sour cream, chilies, cayenne and Rocket Fuel and stir. If you like it spicy, use more Rocket Fuel. Remove from heat or keep sauce on low heat until ready for service.
  5. Fill the center of each tortilla with warmed Mexican Pulled Chicken and both cheeses.
  6. Start rolling away from you in a tight roll until you reach the end, then flip the roll back to have seam side up. Now fold each end up and over about an inch or so and bind with stainless steel clips.
  7. Heat enough oil in a heavy bottomed pot to 350 degrees using a thermometer to get to the correct temperature.
  8. Place two chimichangas in the hot oil making sure they are completely covered by the oil and cook until browned and crispy, about 5 minutes. (Hold down with a metal strainer if necessary). Remove to paper towels and drain, then hold in warm oven. Heat oil back to 350 degrees and cook the other two chimichangas.
  9. With a pot holder or towel, gently remove hot binder clip.
  10. Place on serving platter and cover with the sauce.

Boiled Sesame Ginger Chicken


When it comes to chicken quarters, I feel that the possibilities are slightly limited. Maybe that’s what makes them so cheap. Even so, I buy a lot of chicken quarters. It’s hard to beat 59 cents a pound. Therefore, I am always on the look out for recipes using chicken quarters. I think one of the secrets to cooking chicken quarters ,or any other meat for that matter, is having a variety of spices and condiments in your arsenal. A great many dishes can be made from a well stocked seasoning and condiment shelf. Including this dish, which is one of the best chicken dishes I have had in a long time. It’s sweet, but not too sweet, and has just enough Asian flare to quench the desire for Chinese takeout. This recipe can also be used on bone – in chicken breasts too, just keep an eye on them because they will cook faster than chicken quarters.
2 – 2 1/2 lbs chicken quarters
1/3 cup sweet and sour sauce ( or plum sauce)
3 tablespoons hoisin sauce
2 tablespoons soy sauce
4 teaspoons honey
4 teaspoons water
1 1/2 teaspoons sesame seed
1 teaspoon grated gingerroot ( or 1/4 t. ground ginger, but you should really buy a “hand” of ginger and keep it in your freezer. It lasts forever)
1/4 teaspoon Chinese Five Spice ( I only had Chinese 4 spice and it worked just fine: cloves, cinnamon, fennel seed, ginger)
1 clove garlic, minced
several dashes hot sauce ( optional)
Preheat broiler. Place chicken skin side up on broiler pan. Broil 4-5 inches from heat for 20 minutes.
Meanwhile, Mix remaining ingredients in a saucepan and bring to a boil. Reduce heat and simmer for 2 minutes.
Turn chicken, broil 5-15 minutes more or until chicken is no longer pink. Brush with glaze, broil 2 minutes. Flip chicken, brush with glaze, broil another 2 minutes. Enjoy!

Monday, 6 May 2013

Old-Fashioned Carrot Cake with Vanilla Cream Cheese Frosting


Old-Fashioned Carrot Cake with Vanilla Cream Cheese Frosting

Old-Fashioned Carrot Cake with Vanilla Cream Cheese Frosting

18 Carrot Gold

“Vegetables are a must on a diet.  I suggest carrot cake, zucchini bread and pumpkin pie.”  -Jim Davis

Carrots, those orange-hued gems, have been playing starring roles in baking since medieval times. Prized for their high sugar content (second only to sugar beets) and availability, they stood in nicely for desserts when sweeteners were too expensive or sparse (perhaps rationing was the reason behind carrot cake’s revival in Britain during the Second World War). This unusual cream cheese frosted treat hopped its way across the pond in the early 1960′s, showing up in restaurants and cafeterias across the United States. But carrot cake really came into its “Golden Age” in the 1970′s when this popular confection enjoyed a slot in the Top 5 Food-Fads, ballyhooed for its “health-conscious” properties. (Well, carrots are good for you.) Carrot cake is so well-liked, we have set aside a whole day (back in February) to nationally celebrate this delicious sweet ending.
This is one of Adam’s fav-o-rite desserts (I know, they all are…), but this one, he professes, is the solid gold winner (evident by his scarfing down half of the cake seconds after the photo shoot wrapped). I have to agree – this recipe has everything I want in a carrot cake, too: soft, moist layers with a nuance of pineapple and spice, nestled in a creamy, tangy frosting and showered with crunchy toasted walnuts to boot. It’s pure bliss. Make this little jewel for your spring celebration and you’ll make some bunny very, very happy.
Old-Fashioned Carrot Cake with Vanilla Cream Cheese Frosting
Prep time
Cook time
Total time
Author: 
Recipe type: Cake, Sweets, Desserts
Cuisine: American
Serves: 8
Ingredients
  • For the cake:
  • unsalted butter and all-purpose flour for the pans
  • 2 cups all-purpose flour
  • 2 teaspoons baking powder
  • 1 teaspoon pumpkin pie spice
  • 1 teaspoon ground cinnamon
  • ½ teaspoon salt
  • 4 large eggs, room temperature
  • 1-3/4 cups sugar
  • ¼ cup light brown sugar, lightly packed
  • 2 teaspoons vanilla extract
  • 1 cup canola oil
  • 2 cups freshly shredded carrots
  • one 8-ounce can crushed pineapple in its own juice, well-drained
  • For the frosting:
  • 16 ounces cream cheese, room temperature
  • ¾ cup (1-1/2 sticks) unsalted butter, room temperature
  • 2 teaspoons vanilla extract
  • pinch of salt
  • 3 cups confectioner’s sugar
  • 2 cups toasted, cooled and chopped walnuts
Instructions
  1. Preheat the oven to 350 degrees. Butter two 9-inch cake pans, line the bottoms with parchment rounds, butter the paper and lightly sprinkle with flour. Tap out the excess flour and set pans aside. In a bowl, sift together (a fine mesh strainer is fine) the flour, baking powder, pumpkin pie spice, cinnamon and salt and set aside. In a stand mixer fitted with the paddle attachment, combine the eggs and the sugars and beat on medium-high until slightly thick and pale in color, about 2 minutes. Beat in the vanilla. With the mixer on low, slowly add the oil in a thin stream and mix until combined. With the mixer still on low, add in the flour mixture and mix until just combined. Add in the carrots and pineapple and mix until just combined.
  2. Evenly divide the batter between the prepared pans and bake until the tops are golden and a cake tester comes out clean, about 30 to 35 minutes. Allow the cakes to cool in the pans on wire racks for 10 minutes before turning out onto the racks to cool completely.
  3. Make the frosting: In a stand mixer fitted with the paddle attachment, beat the cream cheese and butter until smooth, occasionally scraping down the bowl with a rubber spatula. Beat in the vanilla and salt. With the mixer on medium, gradually add in the confectioner’s sugar and mix until frosting is smooth.
  4. Place one cake layer on a cake stand or plate. Spread a thick layer of the frosting evenly over the cake. Top with the second cake layer. Spread the remaining frosting evenly over the sides and top of the cake. Sprinkle the walnuts over the top of the cake.
Notes
…from the Picture-Perfect kitchen:
Planning: I leave my cream cheese and butter on the counter overnight to soften. This cake can be refrigerated for up to 2 days (just keep it tightly covered). Take the chill off before serving.
Product Purity: Pure vanilla extract here is essential.
Presentation: Layer cakes, like this one, have that “clearly homemade” look that I absolutely love. It deserves your very prettiest cake stand. Choose a vibrant plate to serve the slices on – the bright color really makes the cake pop. To get the very neatest slices, use a long, thin knife–run it under hot water, dry and slice. Wipe off the knife between slices to keep the moist crumbs at bay.

Beef and Bean Tostadas


Ingredients:
1 lb. ground beef
1 (1.6 oz) packet burrito seasoning (if you can only find taco, that works too)
1/2 c. finely diced onion
1 (15oz) can nacho cheese sauce
1 (15oz) can refried beans
Tostada Shells
Pico de gallo (Fresh or store bought. I buy mine from the produce section)

In microwave safe bowls, heat beans and cheese. Set aside. In a large skillet, brown beef and onions.Drain excess fat. Add burrito seasoning and 1 c. water. Reduce heat and allow to simmer for 5-7 minutes until thickened. Spread shells carefully with beans. Add about 1/4 c. meat mixture on each. Add nacho cheese. Top with Pico de gallo.


Bacon Wrapped, Cream Cheese Stuffed Chicken Breasts


Ingredients: 

1 boneless skinless chicken breast
2 tablespoons cream cheese
1 tablespoon green onion, Chopped
2 pieces bacon, Partially Cooked

Directions:

Pound out Chicken breast so it is about 1/4" thick. 
Mix together cream cheese and green onions and spread cheese mixture over 1 side of chicken breast. Roll Chicken breast up to conceal cream cheese.

Wrap partially cooked bacon around chicken breast and secure with toothpick. Plase on baking sheet and back for about 30 minutes at 375. Broil for about 5 minute to crisp bacon.

Of course you can use as many chicken breasts as you need for this recipe.

Mash Potatoes in Muffin Pans


Just mash potatoes plain with butter or you can add yummy ingredients like cooked bacon, cheese, parsley, green onion, garlic, etc. Stuff in to a greased muffin tin, run a fork along the top and brush with melted butter or olive oil. Bake at 375 degrees or until tops are crispy and golden.

Yes we still need carbs in our diet even when we are trying to lose weight so this is a great way to stick with portion control!!!


Also remember there are varying sizes in muffin pans so you can choose the serving size!! Using mini muffin tins you can turn this into a healthy alternative to chips or wedges too. You still get the soft potato centre with the crunch on the outside without all the fat!!!!


White Chocolate Cheesecake with Raspberries


White Chocolate Cheesecake with Raspberries
This particular cheesecake will be enjoyed at a class lunch to mark the end of the term...wish it was to mark the end of exams! This is a very delicious cheesecake and the delicate flavor of the white chocolate plays very well with the fresh raspberries. Totally uncomplicated but totally delicious, this one is in my personal top 5  favorite cheesecake flavors. It would make an amazing dessert for your holiday feast too; I've already decided that it will be served at mine.

A word about baking a cheesecake in a ban marie before starting the recipe. A bain marie is simply a water bath that buffers the direct heat from the sides and bottom of the baking pan to more evenly bake the cheesecake from the sides to the center. 

I bake my cheesecakes in a 9 or 10 inch springform pan that has the bottom and sides wrapped in multiple layers of wide heavy duty aluminum foil which forms a sort of boat that the cheesecake pan sits in. The roll of aluminum foil that I use is about 16 inches wide. I use at least 4 layers of foil to make sure that no water leaks in and ruins the crust of my cheesecake. The aluminum foil wrapped pan is then placed inside a larger baking pan; I use a 12 inch cake pan. Boiling water is then poured into the larger pan filling it from 1/2 to 2/3 of the way to the top.

I find it best to pour the boiling water into the pan after it is placed on the rack in the oven as you are less likely to splash water onto the cheesecake or inside the aluminum foil. I reuse the aluminum foil for several future cheesecakes, adding a couple of layers to it each time just to be safe..

In a small bowl, combine:

  • 1 1/3 cups graham wafer crumbs
  • 3 tbsp sugar
  • 1/3 cup melted butter

Press into the bottom of a lightly greased springform pan. (Grease bottom only!)

Over low heat in a small saucepan, heat to scalding

  • 1/3 cup whipping cream

Stir in until completely melted:
  • 1 cup good quality white chocolate chips

Set aside to cool slightly while you prepare the rest of the cheesecake batter.

Cream together:
  • 3 eight ounce packages ounces cream cheese
  • 1/2 cup sugar

Add, one at a time
  • 3 eggs
beating well after each addition. Add

3 tsp vanilla extract
melted white chocolate

Finally blend in

1 cup whipping cream

Pour over the prepared base and bake in a bain marie at 325 degrees F for 50 minutes to an hour. The cheesecake should just be beginning to lightly brown at the edges and the surface of the cheesecake should lose any shine when the cake is properly baked. It can still be slightly wobbly just at the center at this point. 

Remove the cake from the oven and run a sharp knife completely around the edge of the pan. This will allow for the cheesecake to shrink as it cools and hopefully not crack (but who cares if it does? I am never bothered by a crack or two in the surface) Allow the cheesecake to cool thoroughly on a wire rack at room temperature. (NOT in the fridge). 

When completely cool cover the top with fresh raspberries and garnish with melted white chocolate if desired.

Sunday, 5 May 2013

Nasi Lemak Recipe


Nasi Lemak Recipe

Ingredients:

Coconut Milk Steamed Rice
2 cups of Long grained rice
4 cups of Coconut milk (Santan)
Some Water
1 inch of Ginger, sliced thinly
2 knots of Pandan leaf, tied it into a knot
1 stick of Lemon grass, smashed
1/2 tsp of Salt

Sambal Tumis
100g of Dried chili
60g of Shallots, blended
30g of Garlic, blended
30g of Dried shrimp paste (Belachan), baked or roasted for about 15mins
50ml of Tamarind juice, mixed with water
100g of medium-size dried anchovies (Ikan bilis), peeled
100g of Red onions, sliced
1 tsp of Salt
2 tbs of Sugar
½ cup of Cooking oil

Pork Rendang
1.2kg of Pork shoulder, boneless
1 pack of Mak Nyonya Perencah Rendang
300ml of Coconut milk
300ml (1 1/2 cups) of Water
100mg of Coconut shred

Kangkong
1 bundle of kangkong (river spinanch); cut stems 1” length
1/4 cup vinegar
1/4 cup soy sauce
1 tablespoon garlic; minced

Other Garnish
Hard boiled eggs, as many as you wish
1 small Cucumber, cut into half and sliced
1 packet of Ground nuts, roasted
Anchovies,


Method:
Coconut milk steamed rice
1.      Just like making steamed rice, rinse your rice and drain.
2.      Add the coconut milk, and soak for 10 minutes.
3.      Add salt to taste
4.      Pour 2tsp of oil in the rice cooker, add the rice and let the oil coat the rice
5.      Now add some water.
6.      Add sliced ginger, pandan leaves and lemon grass into the rice
7.      Place it in rice cooker and cook your rice.
8.      Occasionally loosen rice grains with a chopsticks.

Sambal Tumis
1.      Take out all seeds from the dried chilies so that the sambal will not be too hot.
2.      Then boil and blend the chilies.
3.      Place dried chilies, shallots, garlic and dried shrimp paste in a blender, add 1 cup of water (just enough to cover the ingredient) and blend it into a smooth paste (2 – 3 minutes)
4.      Heat a wok with some cooking oil and pour the paste on to the wok
5.      Stir-fry until the paste is almost dry or it changes color
6.      Add tamarind juice and stir fry again until the paste is almost dry
7.      Add dried anchovies and red onions
8.      Lastly, add 1 salt and sugar to taste.

Kangkong
1.      Saute garlic.
2.      When golden brown, add all other ingredients.  
3.      Cover and simmer until done.
4.      Don’t overcook the kangkong.
5.      Serve hot!

Saturday, 4 May 2013

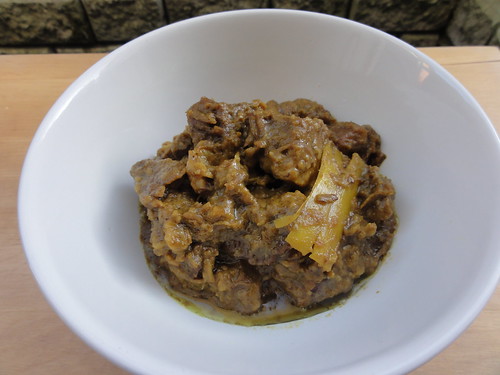
Pork Rendang

Rendang Babi (Pork Rendang)
Rendang is one of Malaysia’s and Indonesia’s most iconic dish. However, it is quite unorthodox to make rendang with pork as many Malaysians and Indonesians are Muslims, and therefore naturally prefer halal meat. Beef and chicken are most common but I am giving pork a try because I have plenty of pork shoulder that I bought when they were on sale.
A classic rendang is a dry coconut stew made by slow cooking meat with spices. It often has notes of lemongrass and kaffir lime leaves with a subtle sweetness from local palm sugar called gula melaka. Recipes seem to vary from place to place but in my opinion, nothing beats a Malay style rendang that is finished with some kerisik, a roasted coconut paste. Rendang goes very well with plain white rice or turmeric rice and as with any stew, it tastes better if you let it sit overnight.

Ingredient:

  • 600 g pork shoulder, cut into 2-3 inch cubes
  • 2 tbsp shallots, fine chopped
  • 1 tbsp ginger, fine chopped
  • 3 cloves garlic, fine chopped
  • 1 tbsp coriander seeds, toasted and ground
  • 1 tsp cumin seeds, toasted and ground
  • 1 tsp turmeric powder
  • 1 lemongrass, bruised
  • 4 kaffir lime leaves, lightly bruised
  • beef stock/water
  • 200 ml coconut milk
  • gula melaka
  • salt/pepper
  • 1 tbsp or so kerisik

Method:

  1. Sear pork shoulder cubes until brown at all sides in a heavy bottomed pot.
  2. Reserve seared pork in a bowl.
  3. Deglaze and remove browned bits with some stock. Reserve the jus in the same bowl as the pork.
  4. Saute shallots, ginger, and garlic with 2 tablespoons of oil until fragrant.
  5. Add the spices, lemongrass, and kaffir lime leaves and saute until fragrant.
  6. Add pork and jus to the pot and add coconut milk and enough stock to go up the meat halfway.
  7. Season with a bit of salt, pepper, and gula melaka to the desired sweetness.
  8. Bring it to a simmer and slowly cook until the meat is “empok” or fork tender, the oil separates, and noticeably dry, at least 2 hours. If the liquid dries up halfway and the meat is not yet tender, top with more stock and continue cooking.
  9. About 15 minutes before cooking is done, add kerisik to the stew.
  10. Serve with white rice.