Saturday, 29 December 2012

Chicken with Soya Sauce & Red Wine

Chicken in Soya Sauce and Red wine
Try this chicken recipe and is worth the effort. The chicken gravy is great when serve with rice. Keep the remainder gravy in the fridge and reuse for the next round. The flavour will become more tasty with each time it is cooked. You can add this sauce to flavour other dishes or add to noodles.
Ingredients:

1.5 kg chicken, cleaned, removed excess fat
1 1/2 cups water
1/2 cup dark soya sauce
1/4 cup light soya sauce
1/2 cup red wine
1 tablespoon seseme oil
2 tablespoon crushed rock sugar
1 large clove garlic
8 slices fresh ginger
2 spring onion, cut into 1 inch size
2 whole star anise
Cooking steps:
1. Choose a pot just enough to hold chicken so that it is just submerged in the cooking liquid.
2. Put the chicken into with breast down and add all the ingredients except the seseme oil.
3. Cover chicken bring to the boil and slowly turn the heat down to simmer chicken gently for 15 minutes.
4. Slowly turn chicken over without piercing its skin. Replace the lid and simmer chicken for further 15 minutes, basting chicken for every 5 minutes.
5. Turn off the heat and leaves chicken submerged in liquid in the pot for 45 minutes. Lift chicken out, and drain away the liquid back into the pot.
6. Brush the chicken all over with seseme oil. Chop the chicken into bite-sized pieces and assemble on the serving plate. Serve some of the gravy as dipping sauce.

Wednesday, 19 December 2012

Cancer Prevention

LATEST CANCER INFORMATION
from Johns Hopkins

AFTER YEARS OF TELLING PEOPLE CHEMOTHERAPY IS THE ONLY WAY TO TRY AND ELIMINATE CANCER, JOHNS HOPKINS IS FINALLY STARTING TO TELL YOU THERE IS AN ALTERNATIVE WAY …


1. Every person has cancer cells in the body. These cancer cells do not show up in the standard tests until they have multiplied to a few billion. When doctors tell cancer patients that there are no more cancer cells in their bodies after treatment, it just means the tests are unable to detect the cancer cells because they have not reached the detectable size.

2. Cancer cells occur between 6 to more than 10 times in a person's lifetime.

3. When the person's immune system is strong the cancer cells will be destroyed and prevented from multiplying and forming tumors.

4. When a person has cancer it indicates the person has multiple nutritional deficiencies. These could be due to genetic, environmental, food and lifestyle factors.

5. To overcome the multiple nutritional deficiencies, changing diet and including supplements will strengthen the immune system.

6. Chemotherapy involves poisoning the rapidly-growing cancer cells and also destroys rapidly-growing healthy cells in the bone marrow, gastro-intestinal tract etc, and can cause organ damage, like liver, kidneys, heart, lungs etc.

7. Radiation while destroying cancer cells also burns, scars and damages healthy cells, tissues and organs.

8. Initial treatment with chemotherapy and radiation will often reduce tumor size. However prolonged use of chemotherapy and radiation do not result in more tumor destruction.

9. When the body has too much toxic burden from chemotherapy and radiation the immune system is either compromised or destroyed, hence the person can succumb to various kinds of infections and complications.

10. Chemotherapy and radiation can cause cancer cells to mutate and become resistant and difficult to destroy. Surgery can also cause cancer cells to spread to other sites.


11. An effective way to battle cancer is to STARVE the cancer cells by not feeding it with foods it needs to multiple.

What cancer cells feed on:

a. Sugar is a cancer-feeder. By cutting off sugar it cuts off one important food supply to the cancer cells. Note: Sugar substitutes like NutraSweet, Equal, Spoonful, etc are made with Aspartame and it is harmful. A better natural substitute would be Manuka honey or molasses but only in very small amounts. Table salt has a chemical added to make it white in colour. Better alternative is Bragg's aminos or sea salt.


b. Milk causes the body to produce mucus, especially in the gastro-intestinal tract. Cancer feeds on mucus. By cutting off milk and substituting with unsweetened soy milk, cancer cells will starved.

c. Cancer cells thrive in an acid environment. A meat-based diet is acidic and it is best to eat fish, and a little chicken rather than beef or pork. Meat also contains livestock antibiotics, growth hormones and parasites, which are all harmful, especially to people with cancer.

d. A diet made of 80% fresh vegetables and juice, whole grains, seeds, nuts and a little fruits help put the body into an alkaline environment. About 20% can be from cooked food including beans. Fresh vegetable juices provide live enzymes that are easily absorbed and reach down to cellular levels within 15 minutes t o nourish and enhance growth of healthy cells.

To obtain live enzymes for building healthy cells try and drink fresh vegetable juice (most vegetables including bean sprouts) and eat some raw vegetables 2 or 3 times a day. Enzymes are destroyed at temperatures of 104 degrees F (40 degrees C).

e. Avoid coffee, tea, and chocolate, which have high caffeine. Green tea is a better alternative and has cancer-fighting properties. Water--best to drink purified water, or filtered, to avoid known toxins and heavy metals in tap water. Distilled water is acidic, avoid it.

12. Meat protein is difficult to digest and requires a lot of digestive enzymes. Undigested meat remaining in the intestines will become putrified and leads to more toxic buildup.

13. Cancer cell walls have a tough protein covering. By refraining from or eating less meat it frees more enzymes to attack the protein walls of cancer cells and allows the body's killer cells to destroy the cancer cells.

14. Some supplements build up the immune system (IP6, Flor-ssence, Essiac, anti-oxidants, vitamins, minerals, EFAs etc.) to enable the body's own killer cells to destroy cancer cells. Other supplements like vitamin E are known to cause apoptosis, or programmed cell death, the body's normal method of disposing of damaged, unwanted, or unneeded cells.

15. Cancer is a disease of the mind, body, and spirit. A proactive and positive spirit will help the cancer warrior be a survivor.

Anger, unforgiving and bitterness put the body into a stressful and acidic environment. Learn to have a loving and forgiving spirit. Learn to relax and enjoy life.

16. Cancer cells cannot thrive in an oxygenated environment. Exercising daily, and deep breathing help to get more oxygen down to the cellular level. Oxygen therapy is another means employed to destroy cancer cells.

Tuesday, 11 December 2012

Rainbow Fruit Posicles


IMG 0263 1024x682 Rainbow Fruit Pops
Summer is almost here, the weather is warm, and we all need something to cool off from the afternoon heat. Bring on the popsicles! We like to make our own because not only does it give us something to do, but we get to choose what goes in them. No processed corn syrup, gobs of sugar or food coloring here. Instead we chose a rainbow of fruit all held together with some homemade lemonade. They turned out so beautiful and delicious and all natural that I can feel great about giving these to my kids.
Rainbow Fruit Popsicles
3 strawberries cut into chunks
1 apricot, cut into small chunks
1 nectarine, cut into small chunks
1 kiwi, cut into small chunks, leaving the seeded center part out
a handful of blueberries
6 purple grapes, cut into chunks
1 lemon
1 – 2 tablespoons agave syrup
1 cup of water
6 popsicle molds
Wash and cut up the fruit, except the lemon. Set aside. Make the lemonade by squeezing the juice from the lemon and adding agave syrup and water. We like ours watered down and not too sweet so the natural fruit flavors really come out. Set up the popsicle molds and begin to layer the fruit. Strawberries, then apricot, nectarine, kiwi, blueberries and finally grapes. Top with the lemonade and place in the freezer for about 2 hours. Serves 6.

Steamed Sticky Glutinous Rice With Chicken (糯米鸡, Lo Mai Kai)


This is a classic dim sum dish which is normally seen wrapped in lotus leaf. In Malaysia, apart from the usual lotus leaf version, we have the take-away version which is normally sold in steel bowls (as seen here) or aluminium foil (as seen here). We normally get these at local coffee shops or even night markets and have them for breakfast. Tasty stuff!

Here in the UK, there's no such thing as take-away
 lo mai gai in foil, so if I crave for it, I will have to make some myself. It takes some time and effort to make, but it's all worth it! These are usually served in tiny portions with only one layer of sausages/chicken/mushrooms on top (as seen here). I don't have tiny bowls to prepare them in, so I used larger bowls and filled them with more sausages/chicken/ mushrooms as I personally prefer less glutinous rice.

Steamed Sticky Glutinous Rice With Chicken Lo Mai Kai 8

Steamed Sticky Glutinous Rice With Chicken 糯米鸡

Printable recipe
Adapted from Ponikuta's recipe
By Pig Pig's Corner

Prep time: 15 mins 
Marinade time: Overnight
Cook time: 1 hr 10 mins 
Yield: one 0.75 L and one 1.25 L Pyrex casserole round dishes, serves 5-6


Ingredients:
For chicken & mushrooms:
  • 700g chicken - chopped
  • 10 Chinese mushrooms - soaked until softened and sliced
  • 3 cloves garlic - pressed
  • 2 tsp sesame oil
  • 2 tbs light soy sauce
  • 1 tbs Cheong Chan Thick Dark Soy Sauce (Thick Caramel Sauce)
  • 3 tbs oyster sauce
  • 2 tbs Shaoxing wine
  • 3 tsp sugar
  • 1 tsp white pepper powder
For glutinous rice:

Directions:
The day before:
  • Mix all ingredients/ seasonings for chicken and mushrooms in a bowl and leave to marinade in the fridge overnight.
  • Wash glutinous rice, add enough water to cover all the rice and leave to soak overnight.
On the day:
For glutinous rice:
  • Drain glutinous rice and mix with 1 cup of water and other ingredients/ seasonings.
Steamed Sticky Glutinous Rice With Chicken Lo Mai Kai 1
  • Place this in a lightly greased steaming bowl.
  • Steam over medium-high heat for 15 mins.
  • Fluff the rice with a fork.
Steamed Sticky Glutinous Rice With Chicken Lo Mai Kai 2
  • Place Chinese sausages on top of rice.
Steamed Sticky Glutinous Rice With Chicken Lo Mai Kai 3
  • Continue steaming for a further 20 mins or until rice is cooked.
  • Remove sausages and slice.
  • Place steamed rice and sausages aside for later use.
For chicken and mushrooms:
  • Heat up a little bit of oil in a pan.
  • Pour in chicken and mushrooms and stir-fry until chicken is cooked.
  • Add more seasonings to suit your taste.
  • Place aside for later use.
To assemble:
  • In lightly greased bowls, place a layer of sausages, chicken and mushrooms.
Steamed Sticky Glutinous Rice With Chicken Lo Mai Kai 4
  • Cover with glutinous rice.
Steamed Sticky Glutinous Rice With Chicken Lo Mai Kai 5
  • Place another layer of sausages, chicken and mushrooms.
Steamed Sticky Glutinous Rice With Chicken Lo Mai Kai 6
  • Cover with rice.
Steamed Sticky Glutinous Rice With Chicken Lo Mai Kai 7
  • Steam over medium-high heat for 30 mins.
  • Turn out steamed rice onto a plate and enjoy!
Steamed Sticky Glutinous Rice With Chicken Lo Mai Kai 9

Steamed Sticky Glutinous Rice With Chicken Lo Mai Kai 10

Panda Bread

Sorry for my lack of activity and visits for the past few days. My in-laws are here and we have been traveling around a lot. We will be heading to Cornwall next week, so here's my last recipe before I leave - a really cute and delicious Panda bread! Saw this over at Not quite Nigella and couldn't resist baking this. The red blobs on top were supposed to form a heart shape, but due to my lack of such skills, it looks like a floating ugly ribbon.

panda bread 16


Panda Bread

Printable recipe
By Pig Pig's Corner

Prep time: 3 hrs 
Cook time: 30 mins 
Yield: 9 x 4" loaf


Ingredients:
  • 210g 1 egg yolk + rice milk (i.e. use 1 egg plus enough rice milk to make up to 210 g)
  • 230g bread flour
  • 70g cake flour
  • 30g caster sugar
  • 4.5g salt
  • 1 packet (7g) instant yeast
  • 18g unsalted butter - softened at room temperature
  • 8g green tea powder - dissolved in 10g boiling water
  • 8g cocoa powder - dissolved in 8g boiling water
  • A few drops of red colouring

Directions:

  • In a microwave-safe bowl, lightly beat together the yolk and milk. Microwave for 30 sec.
  • In a clean mixing bowl, put in flour, sugar, salt, yeast. Mix to combine.
  • Add milk and egg mixture and butter to dry mixture.
  • Using and electric mixer with a dough hook attached, knead until elastic. The dough was a bit sticky, so I added about 1/2 tbs each of bread flour and cake flour to make it less sticky. I left it to knead for about 20 mins.
  • Divide dough (about 560g) into 3 parts: 60g for chocolate, 185g for plain white, 25g for red, the rest (about 290g) for green
panda bread 01
  • Add chocolate paste to 60g dough and knead until well combined.
  • Add red colouring to 25g dough and knead until well combined.
  • Add green tea paste to 290g dough and knead until well combined.
  • Loosely wrap each dough in cling film, prove for 40 mins.
panda bread 02
  • Knead/ fold each dough a few times to re-distribute the air. Prove for another 30 mins.
To shape & assemble:
panda bread 03panda bread 04
1. Shape 70g of plain dough for the face and 2 pieces of 20g chocolate dough for the eyes.Shape to 5.5-6 inches in length.2. Fill the gap in between the eyes with 20g plain dough.
panda bread 05panda bread 06
3. Roll out and place the remaining plain dough over the shaped dough.4. Divide the remaining chocoate dough into 2 pieces for the ears.

panda bread 07panda bread 08
5. Use 20g of green tea dough to fill up the gap in between the ears.6. Use 40g of green tea dough to cover the ears.

panda bread 09panda bread 10
7. Make a slit on the top green tea dough.8. For the heart shape, shape the red dough into a cylinder shape. Cut into 2 lengthwise. Place these 2 in the slit. Leaving a little gap in between the dough.

panda bread 11panda bread 12
9. Fill in the gap with 15g of green dough.10. Roll out and wrap the rest of the green tea dough all around the patterned dough. Leave the bottom unwrapped.

panda bread 13panda bread 14
11. Place dough in a lined loaf pan.12. Cover with cling film. Let prove for about 60 mins in an enclosed area (i.e. microwave/ oven). I placed it in a microwave together with a cup of hot water.
  • Bake at 200℃ for 25-30 mins.
panda bread 15
  • Slice and enjoy!
panda bread 17
  • Delicious with Nutella!
panda bread 18

Chill, Baby! Make Blueberry Cheesecake Popsicles


When the sun is shining and your guests are feelin’ the heat, a cookie, cake or pie are nice but… they simply won’t do it like a homemade frozen treat. And popsicles are way easier (and healthier) to make than ice cream. Find a blender, some molds, your favorite fruit and you’re on your way to making kids giggle and grown-ups feel like kids. (Though if you want the grown-ups to feel like grown-ups, check back next week for recipes for boozy pops).
Popsicles were “invented” by Frank Epperson, when he accidentally left a cup of soda with a stir stick sitting outside on a cold night. He called it the “Eppsicle.” While Frank’s kids preferred referring to their pop’s invention with his name in the title, Frank patented the (way more charming) term “popsicle” in 1923. Nine decades later, we’ve learned a thing or two about making them great. You can, obviously, freeze any drink or puree into a popsicle, but here are some tips to making them more refreshing and delicious than ever.
Picking the Ingredients
From orange juice to chocolate pudding, you can make popsicles out of anything that will freeze. Especially during the summer months, though, the very best base for a popsicle is in-season fruit, pureed in a blender or food processor.  You can jazz up the puree by incorporating ingredients to taste like yogurt, juice, fresh herbs, spices, coconut milk, milk, cream, or—why not?—pudding.  My standard, minimalist, all-fruit, no-dairy popsicle recipe is as follows: Puree 4 cups of diced fruit. Mix with ½ cup of simple syrup and 3 tablespoons of citrus juice (lemon, lime or orange, depending on how much tartness or sweetness the fruit needs).
Sticking with an in-season fruit is one of the keys to sending the flavor of your popsicles into another universe. If you’re buying from a farmer’s market, ask the farmer for her bruised, ugly selection (at a discount!) since blended fruit needn’t be beautiful. Bonus: usually that fruit is the ripest.
Sweeten with Simple Syrup
Simple syrup is my favorite ingredient for sweetening pops since it blends into your mixture easily and evenly. To make 1½ cups of simple syrup, combine 1 cup of sugar and 1 cup of water in a medium saucepan. Bring to a boil, then cool. This stuff will last for eons in your refrigerator and is perfect to have on hand for sweetening iced coffee. Remember that the amount of sugar will vary from fruit to fruit, so always taste your puree and adjust to taste before freezing.
Tart it Up
A natural acid like fresh lemon, lime or orange juice adds a bright, nuanced dimension to popsicles, especially if you’re using very sweet fruit. Since cold tends to numb the tongue a bit, tartness helps to “wake” it up. Lemon juice is the perfect match for any berry while lime juice does wonders to cherries and tropical fruits. Or use a mild vinegar: My favorite thing to do is swirl in a teaspoon of balsamic vinegar into pureed strawberries.
Molds and Sticks
You can find popsicle molds at most housewares stores and wooden sticks at craft stores, but official gear isn’t strictly necessary. The end result isn’t as glamorous, but Dixie cups or ice cube trays stuck with plastic spoons or chopsticks get the job done. Remember, it’s easier to unmold the popsicles if the mold tapers a bit toward the tip.
Unmolding, Storing and Serving
Make sure your pops are frozen throughout—it will take at least 6 hours in your freezer. To unmold, dip the mold in a bowl of hot water or hold under hot running water from the faucet for 10 seconds. Immediately put in a plastic sandwich bag (the simple ones, sans ziplock) or wrap in plastic wrap, and store in your freezer for up to a week.
To serve, fill a big, beautiful bowl with ice and stick the popsicles into the ice with the stick poking out for easy grabbing. Put the bowl in the middle of your dinner table, or walk around and pass your popsicles to your guests.
Blueberry-Lemon Cheesecake Pops
Juicy cherries, sweet strawberries or tangy pineapple are also delicious instead of blueberries for this cheesecake-inspired recipe.
Makes eight 3½ ounce popsicles
4 ounces mascarpone cheese
½ cup plain yogurt
Zest from 1 lemon
¼ cup milk
2 cups blueberries
2 tablespoons fresh lemon juice
3 tablespoons simple syrup
1 cup crushed graham crackers
Equipment:
3½ ounce popsicle molds
Wooden popsicle sticks
Combine dairy: In a medium bowl, vigorously whisk together the mascarpone and plain yogurt until smooth. Add the lemon zest and milk. Mix and set aside.
Blend berries: Put the blueberries, lemon juice and simple syrup in a blender. Puree until smooth. You’ll end up with about 1½ cups of puree.
Combine: Immediately pour the blueberry mixture into the milk mixture. If you let it sit, blueberries tend to get thick and lumpy and turn a funny brown color (they’ll still taste okay, but you’ll have to loosen the lumpy batter by stirring and deal with brown-ish blue colored popsicles). If you want a swirly marbled look, mix just a little. Otherwise, mix a lot.
Fill molds: Carefully pour the mixture into your popsicle molds about 1/3 full. Spoon in 1 teaspoon of graham cracker crumbs. Fill another 1/3 of the way with blueberry mix. Add another layer of graham crackers. Fill to the top and finish with a sprinkling of graham crackers. Insert popsicle sticks into the center of each mold and freeze for at least 8 hours.  
Serve: Unmold and serve.

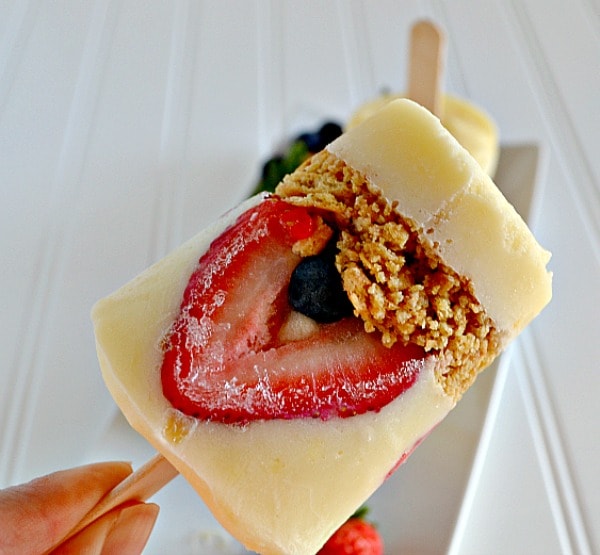
Cheesecake Popsicles


Cheesecake Popsicles
Ingredients
  • (8) 5-ounce Dixie Cups
  • popsicle sticks
  • 8 sheets graham crackers, crushed
  • 2 tablespoons butter, melted
  • 2 (small) packages cheesecake instant pudding mix
  • 4 cups milk
  • sliced strawberries and blueberries
Instructions
  1. Crush your graham crackers into small pieces, using a food processor, blender, rolling pin--whatever you've got!
  2. Stir in melted butter to combine.
  3. Combine pudding mix and milk, whisking together until smooth.
  4. Add a small layer (a spoonful or so) of pudding mix to the bottom of your cups.
  5. Next, add a layer of your graham cracker "crust" (again, about a spoonful).
  6. On top of your graham cracker crumbs, layer in a few sliced berries. Fill cups up the rest of the way with the remaining pudding mix.
  7. Insert popsicle sticks and freeze until set.